论文:Interactive Image Warping(1993年Andreas Gustafsson)
算法思路:

以眼睛中心为中心点,对眼睛区域向外放大,就实现了大眼的效果。大眼的基本公式如下,

假设眼睛中心点为O(x,y),大眼区域半径为Radius,当前点位为A(x1,y1),对其进行改进,加入大眼程度控制变量Intensity,其中Intensity的取值范围为0~100。
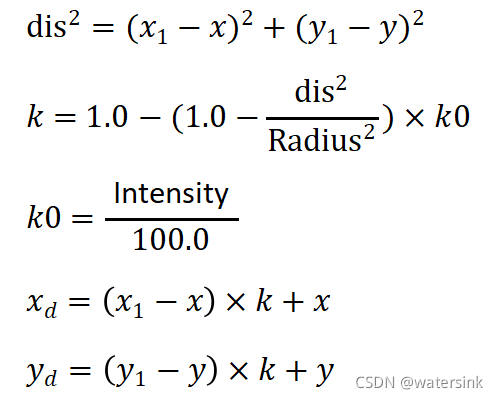
其中,dis表示AO的欧式距离,k表示缩放比例因子,k0表示大眼程度,xd,yd表示A点经过大眼变换后的目标点B的坐标。
当k=0时,目标点B与O点重合。
当k=1时,目标点B与A点重合。
当k<1.0时,目标点B的计算函数单调递增,眼睛放大。
当k>1.0时,目标点B的计算函数单调递减,眼睛缩小。
人眼半径求法,

根据眼睛左右2个关键点来计算大眼区域所在的半径Radius

大眼程度Intensity求法,
根据图像分辨率,结合实际经验来计算大眼程度Intensity。
比如Intensity = 15*512*512/(width*height)
应用场景:
适用于任何球形局部形变的场景,比如大眼,比如嘴唇微笑。
代码实现:
import cv2
import math
import numpy as np

def big_eye_adjust_fast(src, PointX, PointY, Radius, Strength):
  processed_image = np.zeros(src.shape, np.uint8)
  processed_image = src.copy()
  height = src.shape[0]
  width = src.shape[1]
  PowRadius = Radius * Radius

  maskImg = np.zeros(src.shape[:2], np.uint8)
  cv2.circle(maskImg, (PointX, PointY), math.ceil(Radius), (255, 255, 255), -1)

  mapX = np.vstack([np.arange(width).astype(np.float32).reshape(1, -1)] * height)
  mapY = np.hstack([np.arange(height).astype(np.float32).reshape(-1, 1)] * width)

  OffsetX = mapX - PointX
  OffsetY = mapY - PointY
  XY = OffsetX * OffsetX + OffsetY * OffsetY

  ScaleFactor = 1 - XY / PowRadius
  ScaleFactor = 1 - Strength / 100 * ScaleFactor
  UX = OffsetX * ScaleFactor + PointX
  UY = OffsetY * ScaleFactor + PointY
  UX[UX < 0] = 0
  UX[UX >= width] = width - 1
  UY[UY < 0] = 0
  UY[UY >= height] = height - 1

  np.copyto(UX, mapX, where=maskImg == 0)
  np.copyto(UY, mapY, where=maskImg == 0)

  UX = UX.astype(np.float32)
  UY = UY.astype(np.float32)

  processed_image = cv2.remap(src, UX, UY, interpolation=cv2.INTER_LINEAR)

  return processed_image

image = cv2.imread("tests/images/klst.jpeg")
processed_image = image.copy()
PointX_left, PointY_left, Radius_left, Strength_left = 150, 190, 44, 19.78
PointX_right, PointY_right, Radius_right, Strength_right = 244, 194, 42, 19.78
processed_image = big_eye_adjust_fast(processed_image, PointX_left, PointY_left, Radius_left, Strength_left)
processed_image = big_eye_adjust_fast(processed_image, PointX_right, PointY_right, Radius_right, Strength_right)
cv2.imwrite("big.jpg", processed_image)
实验效果:

到此这篇关于pytorch 膨胀算法实现大脸效果的文章就介绍到这了,更多相关pytorch 膨胀算法内容请搜索服务器之家以前的文章或继续浏览下面的相关文章希望大家以后多多支持服务器之家!
原文链接:https://blog.csdn.net/qq_14845119/article/details/121516646
本文链接:https://my.lmcjl.com/post/16185.html
展开阅读全文
4 评论