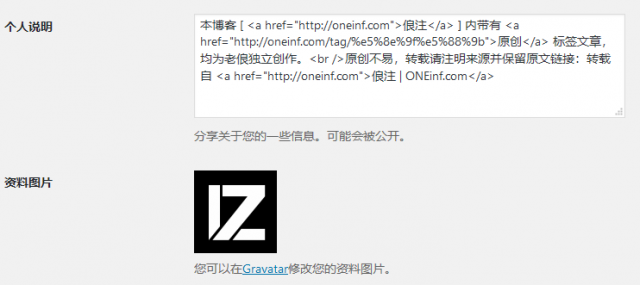
删除了《WordPress文章版权插件:Add Post URL》后总是感觉少了点东西,可能是因为看习惯在文章下面有个版权信息。从网上搜了一下无插件实现 WordPress 文章尾部版权信息模块的文章还挺多,测试了几个感觉还不错,分享给俍友们。
方法一:代码自动调用网站作者信息,不但修改起来比较方便,如果是多作者博客,可以根据不同作者文章显示不一样的版权信息。

步骤一、将下面的代码直接添加到当前主题的 functions.php 文件的最后位置。
//作者信息
function wpb_author_info_box( $content ) {
global $post;
// Detect if it is a single post with a post author
if ( is_single() && isset( $post->post_author ) ) {
// Get author's display name
$display_name = get_the_author_meta( 'display_name', $post->post_author );
// If display name is not available then use nickname as display name
if ( empty( $display_name ) )
$display_name = get_the_author_meta( 'nickname', $post->post_author );
// Get author's biographical information or description
$user_description = get_the_author_meta( 'user_description', $post->post_author );
// Get author's website URL
$user_website = get_the_author_meta('url', $post->post_author);
// Get link to the author archive page
$user_posts = get_author_posts_url( get_the_author_meta( 'ID' , $post->post_author));
if ( ! empty( $display_name ) )
$author_details = '<p class="author_name">About ' . $display_name . '</p>';
if ( ! empty( $user_description ) )
// Author avatar and bio
$author_details .= '<p class="author_details">' . get_avatar( get_the_author_meta('user_email') , 90 ) . nl2br( $user_description ). '</p>';
$author_details .= '<p class="author_links"><a href="'. $user_posts .'">View all posts by ' . $display_name . '</a>';
// Check if author has a website in their profile
if ( ! empty( $user_website ) ) {
// Display author website link
$author_details .= ' | <a href="' . $user_website .'" target="_blank" rel="nofollow">Website</a></p>';
} else {
// if there is no author website then just close the paragraph
$author_details .= '</p>';
}
// Pass all this info to post content
$content = $content . '<footer class="author_bio_section" >' . $author_details . '</footer>';
}
return $content;
}
// Add our function to the post content filter
add_action( 'the_content', 'wpb_author_info_box' );
// Allow HTML in author bio section
remove_filter('pre_user_description', 'wp_filter_kses');
步骤二、增加 CSS 样式到当前主题样式表文件。
.author_bio_section{
background: none repeat scroll 0 0 #F5F5F5;
padding: 15px;
border: 1px solid #ccc;
}

.author_name{
font-size:16px;
font-weight: bold;
}

.author_details img {
border: 1px solid #D8D8D8;
border-radius: 50%;
float: left;
margin: 0 10px 10px 0;
}
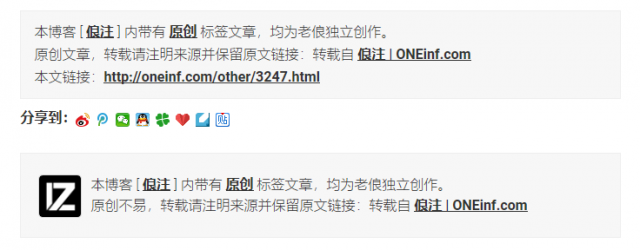
增加完成后就可以在文章页面查看效果,不同主题需要微调才可以达到最佳效果。下图底部效果就是老俍调整完的样式。

此方法唯一缺点就是不能增加“本文链接”输出,因为个人说明里面只支持 html 但不能调用函数。如果一定想要“本文链接”的请往下看。
方法二:直接把转载和版权信息写到当前主题的 functions.php 当中,就可以在每篇文章的最后显示了。缺点不好看,我也不会改成好看的样式,但是有“本文链接”输出。
function feed_copyright($content) {
    if(is_single() or is_feed()) {
        $content.= '<div>转载请注明来源:<a rel="bookmark" title="'.get_the_title().'" href="'.get_permalink().'">'.get_the_title().'</a></div>';
        $content.= '<div>本文链接地址:<a rel="bookmark" title="'.get_the_title().'" href="'.get_permalink().'">'.get_permalink().'</a></div>';
        $content.= '<div>订阅本站:<a title="俍注" href="http://www.my.lmcjl.com/rss">http://www.my.lmcjl.com/rss</a></div>';
        $content.= "</blockquote>";
    }
    return $content;
}
add_filter ('the_content', 'feed_copyright');
方法三:在当前模板的 single.php 文件中增加转载或版权信息。
找到外观 >> 编辑 single.php 文件,找到类似 div class=”content” 的源码,在下面合适的位置(多试两次)增加下面的代码。
本文由<?php the_author_posts_link(); ?>,转载请注明转自:<?php bloginfo('name'); ?><a href="<?php echo get_settings('home'); ?>"><?php echo get_settings('home'); ?></a>;
如果你觉得本博内容不错,欢迎 <a href="http://www.my.lmcjl.com" target="_blank">订阅我的博客</a>,以便第一时间了解本博更新内容;
本文链接:<a href="<?php the_permalink() ?>" title="<?php the_title(); ?>"><?php the_permalink(); ?></a>
当然,为了省事也可以通过插件直接实现。《WordPress文章版权插件:Add Post URL》
本站 [ 俍注 ] 内除注明转载文章,其他均为老俍独立创作,采用「CC BY-NC-ND 4.0」创作共享协议。
原创不易,希望保留原文链接转载,原文链接:https://my.lmcjl.com/tech/3362.html
本文链接:https://my.lmcjl.com/post/16941.html

4 评论