竞赛介绍
数据集描述
本次竞赛的数据集(训练和测试)是从根据机器故障预测训练的深度学习模型生成的。特征分布与原始分布接近,但不完全相同。随意使用原始数据集作为本次竞赛的一部分,既可以探索差异,也可以了解在训练中合并原始数据集是否可以提高模型性能。
文件
训练.csv - 训练数据集; 是(二进制)目标(为了与原始数据集的顺序保持一致,它不在最后一列位置)Machine failure
测试.csv - 测试数据集;您的目标是预测概率Machine failure
sample_submission.csv - 正确格式的示例提交文件
竞赛地址
https://www.kaggle.com/competitions/playground-series-s3e17
目录
- 竞赛介绍
- 数据集描述
- 文件
- 竞赛地址
- 参赛项目
- 介绍
- 二分类相关知识点介绍
- 二分类
- 准确度
- 交叉熵
- 损失函数
- 评价指标
- 项目源码
- 获取数据
- 查看行
- 查看训练数据
- 查看测试数据
- 将训练数据的目标值单独拿出
- 查看训练数据的目标值
- 将训练集分割为训练集和验证集
- 查看训练集中非数值数据
- 将训练集中非数值数据进行onehot编码,数值数据转换为标准差形式
- 创建模型
- 编译模型
- 训练模型
- 验证模型
- 对测试数据进行预测
参赛项目
介绍
采用二分类方法进行数据预测,本篇文章主要以入门为主,详细介绍二元分类的使用方法,下一篇文章将详细介绍冠军的代码
二分类相关知识点介绍
二分类
分类为一个常见的机器学习问题之一。你可能想预测客户是否有可能进行购买,信用卡交易是否存在欺诈,宇宙信号是否显示有新行星的证据,或者医学检测有疾病的证据。这些都是二分类问题。
在原始数据中,类可能由“Yes”和“No”或“Dog”和“Cat”等字符串表示。在使用这些数据之前,我们将分配一个类标签:一个类将是0,另一个将是1。指定数字标签将数据置于神经网络可以使用的形式。
准确度
衡量分类问题成功与否的众多指标之一。准确度是正确预测与总预测的比率:准确度=正确数/总数。一个总是正确预测的模型的准确度得分为1.0。在所有其他条件相同的情况下,每当数据集中的类以大约相同的频率出现时,准确度是一个合理的指标。
交叉熵
准确性(以及大多数其他分类指标)的问题在于,它不能用作损失函数。随机梯度下降法(SGD)需要一个平稳变化的损失函数,但精度,作为计数的比率,在“跳跃”中变化。因此,我们必须选择一个替代品作为损失函数。这个替代品是交叉熵函数。
回想一下损失函数定义了训练期间网络的目标。通过回归,我们的目标是最小化预期结果和预测结果之间的距离。我们选择了MAE来测量这个距离。
对于分类,我们想要的是概率之间的距离,这就是交叉熵提供的。交叉熵是一种度量从一个概率分布到另一个概率分布的距离的方法。
损失函数
对于二分类问题,常用的损失函数有:
- binary_crossentropy:对Sigmoid/Logistic激活得到的概率计算loss,更适用于二分类。
- mean_squared_error:直接对不激活的预测结果计算MSE loss,不是很符合二分类的真实损失计算方式。
评价指标
评价指标也具有相似性,二分类常用:
- binary_accuracy:根据阈值将概率转为0/1预测,计算准确率。
- AUC:计算ROC曲线下的面积,作为模型区分正负样本能力的重要指标。
优化器的选择也相对灵活,常用的有: - SGD:简单梯度下降,容易设置但收敛慢,需要较小的学习率。
- Adam:运用梯度的一阶矩估计和二阶矩估计动态调整每个参数的学习率,收敛快。
- RMSprop:也是对每个参数的学习率进行调整,可以加速SGD收敛,在一定程度上解决了它的缺点。
项目源码
获取数据
import pandas as pd
from IPython.display import displayX_test = pd.read_csv('test.csv')
X_train = pd.read_csv('train.csv')sid = X_test["id"]
查看行
print(X_train.columns)
Index(['id', 'Product ID', 'Type', 'Air temperature [K]','Process temperature [K]', 'Rotational speed [rpm]', 'Torque [Nm]','Tool wear [min]', 'Machine failure', 'TWF', 'HDF', 'PWF', 'OSF','RNF'],dtype='object')
查看训练数据
X_train
| id | Product ID | Type | Air temperature [K] | Process temperature [K] | Rotational speed [rpm] | Torque [Nm] | Tool wear [min] | Machine failure | TWF | HDF | PWF | OSF | RNF | |
|---|---|---|---|---|---|---|---|---|---|---|---|---|---|---|
| 0 | 0 | L50096 | L | 300.6 | 309.6 | 1596 | 36.1 | 140 | 0 | 0 | 0 | 0 | 0 | 0 |
| 1 | 1 | M20343 | M | 302.6 | 312.1 | 1759 | 29.1 | 200 | 0 | 0 | 0 | 0 | 0 | 0 |
| 2 | 2 | L49454 | L | 299.3 | 308.5 | 1805 | 26.5 | 25 | 0 | 0 | 0 | 0 | 0 | 0 |
| 3 | 3 | L53355 | L | 301.0 | 310.9 | 1524 | 44.3 | 197 | 0 | 0 | 0 | 0 | 0 | 0 |
| 4 | 4 | M24050 | M | 298.0 | 309.0 | 1641 | 35.4 | 34 | 0 | 0 | 0 | 0 | 0 | 0 |
| ... | ... | ... | ... | ... | ... | ... | ... | ... | ... | ... | ... | ... | ... | ... |
| 136424 | 136424 | M22284 | M | 300.1 | 311.4 | 1530 | 37.5 | 210 | 0 | 0 | 0 | 0 | 0 | 0 |
| 136425 | 136425 | H38017 | H | 297.5 | 308.5 | 1447 | 49.1 | 2 | 0 | 0 | 0 | 0 | 0 | 0 |
| 136426 | 136426 | L54690 | L | 300.5 | 311.8 | 1524 | 38.5 | 214 | 0 | 0 | 0 | 0 | 0 | 0 |
| 136427 | 136427 | L53876 | L | 301.7 | 310.9 | 1447 | 46.3 | 42 | 0 | 0 | 0 | 0 | 0 | 0 |
| 136428 | 136428 | L47937 | L | 296.9 | 308.1 | 1557 | 39.3 | 229 | 0 | 0 | 0 | 0 | 0 | 0 |
136429 rows × 14 columns
查看测试数据
X_test
| id | Product ID | Type | Air temperature [K] | Process temperature [K] | Rotational speed [rpm] | Torque [Nm] | Tool wear [min] | TWF | HDF | PWF | OSF | RNF | |
|---|---|---|---|---|---|---|---|---|---|---|---|---|---|
| 0 | 136429 | L50896 | L | 302.3 | 311.5 | 1499 | 38.0 | 60 | 0 | 0 | 0 | 0 | 0 |
| 1 | 136430 | L53866 | L | 301.7 | 311.0 | 1713 | 28.8 | 17 | 0 | 0 | 0 | 0 | 0 |
| 2 | 136431 | L50498 | L | 301.3 | 310.4 | 1525 | 37.7 | 96 | 0 | 0 | 0 | 0 | 0 |
| 3 | 136432 | M21232 | M | 300.1 | 309.6 | 1479 | 47.6 | 5 | 0 | 0 | 0 | 0 | 0 |
| 4 | 136433 | M19751 | M | 303.4 | 312.3 | 1515 | 41.3 | 114 | 0 | 0 | 0 | 0 | 0 |
| ... | ... | ... | ... | ... | ... | ... | ... | ... | ... | ... | ... | ... | ... |
| 90949 | 227378 | L51130 | L | 302.3 | 311.4 | 1484 | 40.4 | 15 | 0 | 0 | 0 | 0 | 0 |
| 90950 | 227379 | L47783 | L | 297.9 | 309.8 | 1542 | 33.8 | 31 | 0 | 0 | 0 | 0 | 0 |
| 90951 | 227380 | L48097 | L | 295.6 | 306.2 | 1501 | 41.4 | 187 | 0 | 0 | 0 | 0 | 0 |
| 90952 | 227381 | L48969 | L | 298.1 | 307.8 | 1534 | 40.3 | 69 | 0 | 0 | 0 | 0 | 0 |
| 90953 | 227382 | L52525 | L | 303.5 | 312.8 | 1534 | 36.1 | 92 | 0 | 0 | 0 | 0 | 0 |
90954 rows × 13 columns
将训练数据的目标值单独拿出
Y_train = X_train.pop('Machine failure')
查看训练数据的目标值
Y_train
0         0
1         0
2         0
3         0
4         0..
136424    0
136425    0
136426    0
136427    0
136428    0
Name: Machine failure, Length: 136429, dtype: int64
将训练集分割为训练集和验证集
from sklearn.model_selection import train_test_split
X_train, X_valid, y_train, y_valid = \train_test_split(X_train,Y_train, stratify=Y_train, train_size=0.75)
查看训练集中非数值数据
X_train['Type'].unique()
array(['M', 'L', 'H'], dtype=object)
X_valid['Type'].unique()
array(['L', 'M', 'H'], dtype=object)
X_test['Type'].unique()
array(['L', 'M', 'H'], dtype=object)
将训练集中非数值数据进行onehot编码,数值数据转换为标准差形式
from sklearn.preprocessing import StandardScaler, OneHotEncoder
from sklearn.impute import SimpleImputer
from sklearn.pipeline import make_pipeline
from sklearn.compose import make_column_transformer# X_train['Type'] = \
#     X_train['Type'].map(
#         {'L':1, 'M': 2, 'H':3}
#     )
# X_valid['Type'] = \
#     X_valid['Type'].map(
#         {'L':1, 'M': 2, 'H':3}
#     )
# X_test['Type'] = \
#     X_test['Type'].map(
#         {'L':1, 'M': 2, 'H':3}
#     )# 数值数据的特征
features_num = ["Air temperature [K]","Process temperature [K]","Rotational speed [rpm]","Torque [Nm]","Tool wear [min]","TWF","HDF","PWF","OSF","RNF",
]
# 非数值数据的特征
features_cat = ["Type",
]# 创建标准化管道
transformer_num = make_pipeline(SimpleImputer(strategy="constant"), # there are a few missing valuesStandardScaler(),
)
# 创建onehot编码管道
transformer_cat = make_pipeline(SimpleImputer(strategy="constant"),OneHotEncoder(handle_unknown='ignore'),
)preprocessor = make_column_transformer((transformer_num, features_num),(transformer_cat, features_cat),
)X_train = preprocessor.fit_transform(X_train)
X_valid = preprocessor.transform(X_valid)
X_test = preprocessor.transform(X_test)input_shape = [X_train.shape[1]]
创建模型
from tensorflow import keras
from tensorflow.keras import layersmodel = keras.Sequential([layers.BatchNormalization(input_shape=input_shape),layers.Dense(256, activation='relu'),layers.BatchNormalization(),layers.Dropout(0.5),layers.Dense(256, activation='relu'),layers.BatchNormalization(),layers.Dropout(0.5),layers.Dense(1, activation='sigmoid'),
])
编译模型
model.compile(#选择Adam作为优化器optimizer='adam', #因为是二分类问题,所以使用binary_crossentropy作为损失函数loss='binary_crossentropy',#计算二分类精度,所以使用binary_accuracy作为评价指标metrics=['binary_accuracy'],)
训练模型
early_stopping = keras.callbacks.EarlyStopping(patience=5,min_delta=0.001,restore_best_weights=True,
)
history = model.fit(X_train, y_train,validation_data=(X_valid, y_valid),batch_size=512,epochs=10,callbacks=[early_stopping],
#     verbose=0, # hide the output because we have so many epochs
)history_df = pd.DataFrame(history.history)
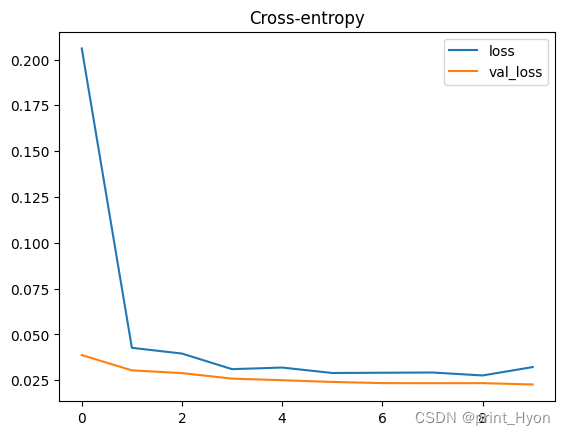
history_df.loc[:, ['loss', 'val_loss']].plot(title="Cross-entropy")# 交叉熵
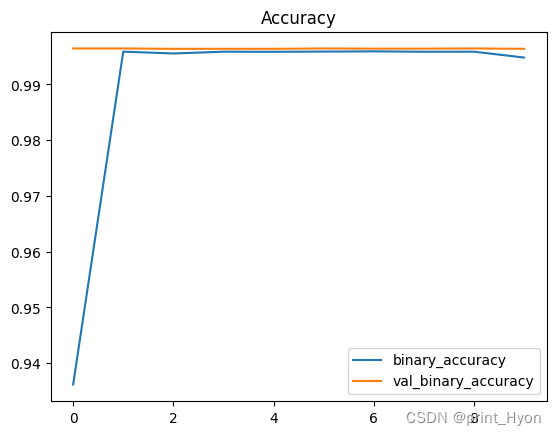
history_df.loc[:, ['binary_accuracy', 'val_binary_accuracy']].plot(title="Accuracy")# 准确性
Epoch 1/10
200/200 [==============================] - 6s 18ms/step - loss: 0.2060 - binary_accuracy: 0.9362 - val_loss: 0.0387 - val_binary_accuracy: 0.9965
Epoch 2/10
200/200 [==============================] - 3s 16ms/step - loss: 0.0427 - binary_accuracy: 0.9959 - val_loss: 0.0303 - val_binary_accuracy: 0.9965
Epoch 3/10
200/200 [==============================] - 3s 17ms/step - loss: 0.0395 - binary_accuracy: 0.9956 - val_loss: 0.0289 - val_binary_accuracy: 0.9964
Epoch 4/10
200/200 [==============================] - 3s 17ms/step - loss: 0.0310 - binary_accuracy: 0.9959 - val_loss: 0.0258 - val_binary_accuracy: 0.9964
Epoch 5/10
200/200 [==============================] - 3s 17ms/step - loss: 0.0319 - binary_accuracy: 0.9959 - val_loss: 0.0250 - val_binary_accuracy: 0.9964
Epoch 6/10
200/200 [==============================] - 3s 17ms/step - loss: 0.0289 - binary_accuracy: 0.9959 - val_loss: 0.0240 - val_binary_accuracy: 0.9965
Epoch 7/10
200/200 [==============================] - 3s 17ms/step - loss: 0.0291 - binary_accuracy: 0.9959 - val_loss: 0.0234 - val_binary_accuracy: 0.9964
Epoch 8/10
200/200 [==============================] - 3s 17ms/step - loss: 0.0292 - binary_accuracy: 0.9959 - val_loss: 0.0234 - val_binary_accuracy: 0.9964
Epoch 9/10
200/200 [==============================] - 3s 17ms/step - loss: 0.0276 - binary_accuracy: 0.9959 - val_loss: 0.0234 - val_binary_accuracy: 0.9965
Epoch 10/10
200/200 [==============================] - 3s 17ms/step - loss: 0.0321 - binary_accuracy: 0.9948 - val_loss: 0.0226 - val_binary_accuracy: 0.9964<AxesSubplot:title={'center':'Accuracy'}>


验证模型
# 获取验证集的预测结果
Y_valid_predict = model.predict(X_valid)
# 将预测结果由概率转变为0或1
threshold = 0.5
Y_valid_predict = (Y_valid_predict > threshold).astype('int')
1066/1066 [==============================] - 3s 3ms/step
# 计算预测的准确性
from sklearn.metrics import accuracy_score
acc_score = accuracy_score(Y_valid_predict, y_valid)
print("Accuracy on valid set: {}%".format(acc_score*100))
Accuracy on valid set: 99.6393807904304%
对测试数据进行预测
X_test
array([[ 1.30927485, 1.12648811, -0.15104398, ..., 0. ,1. , 0. ],[ 0.98707189, 0.76543703, 1.38960729, ..., 0. ,1. , 0. ],[ 0.77226992, 0.33217574, 0.03613795, ..., 0. ,1. , 0. ],...,[-2.2886582 , -2.7006533 , -0.13664537, ..., 0. ,1. , 0. ],[-0.94614587, -1.54528986, 0.10093169, ..., 0. ,1. , 0. ],[ 1.95368077, 2.06522091, 0.10093169, ..., 0. ,1. , 0. ]])
# 获取验证集的预测结果
Y_test = model.predict(X_test)
2843/2843 [==============================] - 7s 3ms/step
# 将预测结果由概率转变为0或1
threshold = 0.5
Y_test = (Y_test > threshold).astype('int')
import numpy as np
sid = np.array(sid)
Y_test
array([[0],[0],[0],...,[0],[0],[0]])
output = pd.DataFrame({"id": sid, "Machine failure": Y_test[:, 0]})
output.to_csv('submission.csv', index=False)
print("Your submission was successfully saved!")
Your submission was successfully saved!
本文链接:https://my.lmcjl.com/post/2698.html

4 评论