搭建论坛:
重启数据库[root@server20 html]# systemctl restart mariadb
开启数据库[root@server20 html]# mysql -uroot -pwestos
首先要找到论坛的模板--->百度搜索:论坛模板--->下载
lftp 172.25.254.250 cd pub/ get Discuz_X3.2_SC_UTF8.zip
解压unzip Discuz_X3.2_SC_UTF8.zip
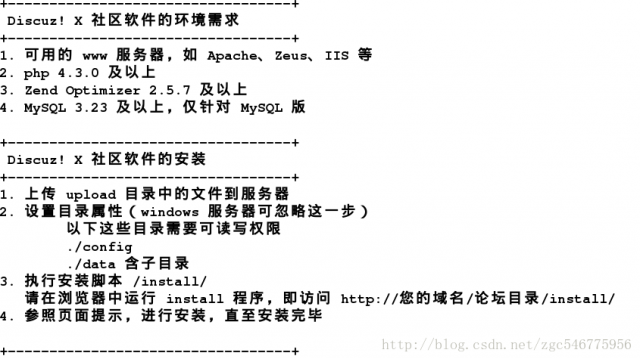
查看说明文件[root@server20 mnt]# cd readme
changelog.txt convert.txt license.txt readme.txt upgrade.txt
[root@server20 readme]# less readme.txt
移动到共享目录
[root@server20 ~]# cd /mnt
[root@server20 mnt]# ls
[root@server20 mnt]# cp -r upload/ /var/www/html/
授权 [root@server20 mnt]# chmod 777 /var/www/html/upload/* -R
//-R表示对目录和文件都授予权限
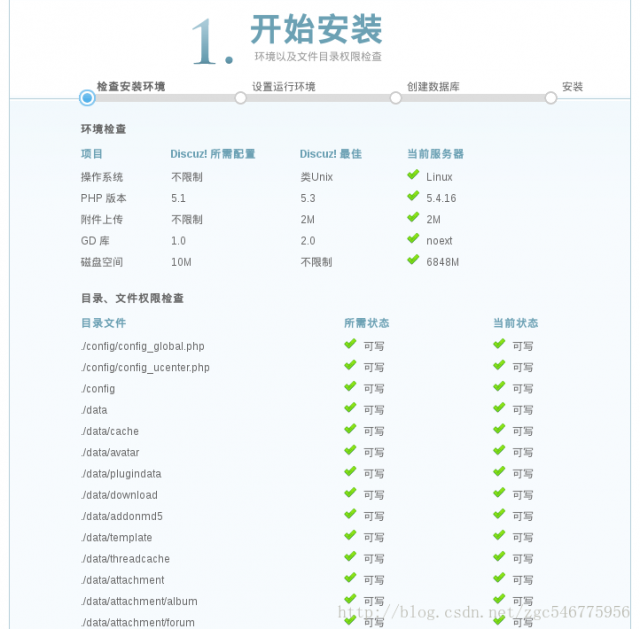
检测 浏览器输入http://172.25.254.120/upload/install/
这样就搭建好了论坛
Squid:(代理缓存服务器)
网站架构模式:LAMP架构,Apache稳定著称,同步的阻塞模式,安全稳定,效率低,多用于数据交互性强的网页。
Linux(提供平台)+Apache(web服务器做文件共享)+Mysql(数据的存储Php/Perl/Python(网页与数据进行交互,python多用于用户注册,用于大数据挖掘)
LNMP架构,nginx速度著称,异步的非阻塞模式,安全稍差,效率高,用于门户性网站。
-------------------------------------------
正向代理:
VPN(使我能和代理连接)
整体的实验思路就是,使虚拟机能上网,真机不能,然后把虚拟机设置成真机的代理,使得真机能上网(也不是真的能上网,就是相当于虚拟机先把真机要访问的内容缓存下来,然后真机去读取缓存)
先使虚拟机能上网
vim /etc/sysconfig/network-scripts/ifcfg-eth0
##
GATEWAY=172.25.254.250(加个网关)
##
route -n 查看网关
重启网络
现在能ping ip,ping不了地址,加个解析
vim /etc/resolv.conf
##
nameserver 114.114.114.114
##
现在能ping通地址,这样能上网的虚拟机就配置好了
在虚拟机中安装squid
yum install squid -y
vim /etc/squid/squid.conf
##
56 http_access allow all(允许所有人使用)
62 cache_dir ufs /var/spool/squid 100 16 256(取消注释 100M 16个一级目录 256个二级目录)
##
systemctl restart squid
firewall-cmd --permanent --add-port=3128/tcp(使3128端口能通过防火墙)firewall-cmd --reload
ss -antlupe | grep squid(查看端口)
在真机中打开浏览器还是访问不了www.baidu.com
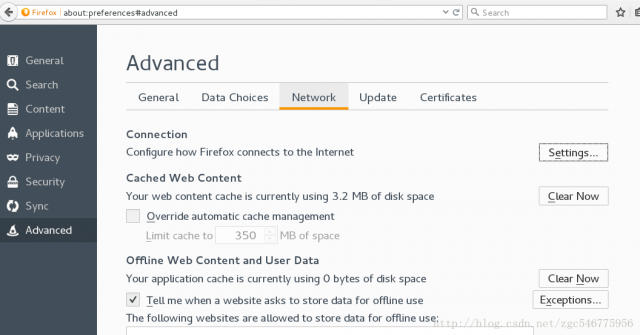
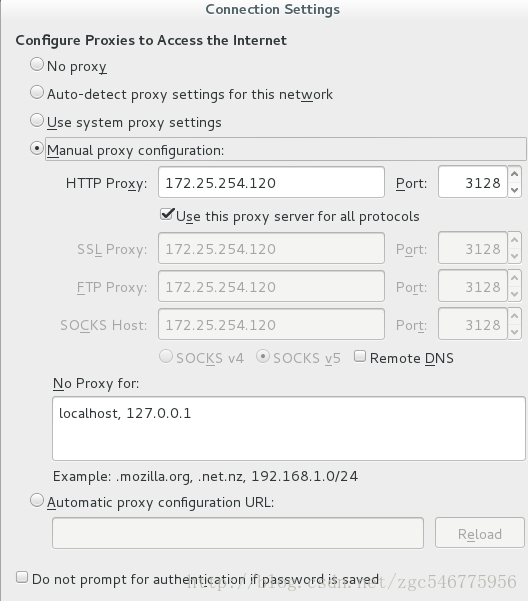
在浏览器的右上角open menu-Preferences-Advanced-Network-Settings-Manual proxy configuration-HTTP Proxy:172.25.254.120 Port:3128(设置代理和端口)选中Use this proxy server for all protocols
然后就能访问www.baidu.com等网站了,并且真机ping www.baiadu.com 不通
-------------------------------------------------------------
反向代理:(两台虚拟机)(功能:减少了服务器的压力,增快了用户的访问速度)
准备工作:在第二台电脑(203)中配置好网络和yum仓库地址(不要装apache)
yum install squid -y
systemctl start httpd
systemctl start squid
[root@localhost ~]# systemctl start squid
查看是否有httpd服务netstat -antlupe | grep httpd
[root@localhost ~]# netstat -antlupe | grep httpd
tcp6 0 0 :::80 :::* LISTEN 0 49046 2434/httpd
[root@localhost ~]# netstat -antlupe | grep squid
tcp6 0 0 :::3128 :::* LISTEN 0 49543 2462/(squid-1)
udp 0 0 0.0.0.0:53873 0.0.0.0:* 23 49540 2462/(squid-1)
udp6 0 0 :::60019 :::* 23 49539 2462/(squid-1)
vim /etc/squid/squid.conf(更改配置文件)
##
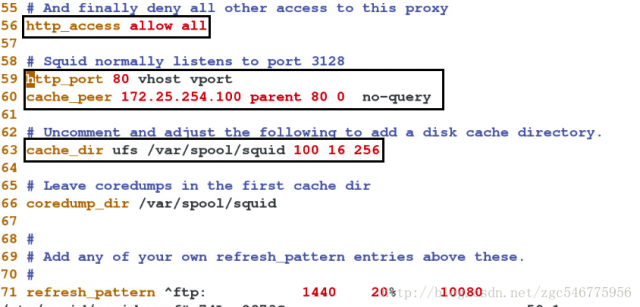
http_access allow all
http_port 80 vhost vport //客户端默认端口80(因为apache的端口的是80)
支持虚拟域 支持虚拟端口
cache_peer 172.25.254.120 parent 80 0 no-query //60行
缓存策略 访问的主机 对象 访问的端口 备用的端口 告诉系统没有备份主机
cache_dir ufs /var/spool/squid 100 16 256
##
systemctl restart squid
设置火墙浏览器去除代理
检测:访问172.25.254.220,显示的是103的默认发布文件,成功。
PS:查找帮助cd /usr/share--->搜索/cache_peer(缓存策略)
--------------------------------------------------------------------------
squid集群,一台主机作为调度器,其他主机作为服务器,轮流处理
平衡轮训,一次一个解决一个
使用3台虚拟机172.25.254.100 172.25.254.103 172.25.254.203(作为调度),真机访问
调度机中vim /etc/squid/squid.conf
##
cache_peer 172.25.254.120 parent 80 0 no-query originserver round-robin name=webserver1
cache_peer 172.25.254.100 parent 80 0 no-query originserver round-robin name=webserver2
cache_peer_domain webserver1 webserver2 www.westos.com
##
//orginserver设置预主机的方式 round-robin 设置方式为轮循 name=webserver1名称设定成web1
systemctl restart squid.service
本地解析vim /etc/hosts(在使用浏览器的机器里配置)
172.25.254.203 www.westos.com
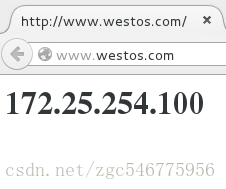
测试:浏览器输入www.westos.com,轮循为刷新一个,切换一台处理机
本文链接:https://my.lmcjl.com/post/15094.html
展开阅读全文






4 评论