vue图片裁剪插件vue-cropper使用方法详解

本文实例为大家分享了vue图片裁剪插件vue-cropper的使用方法,供大家参考,具体内容如下

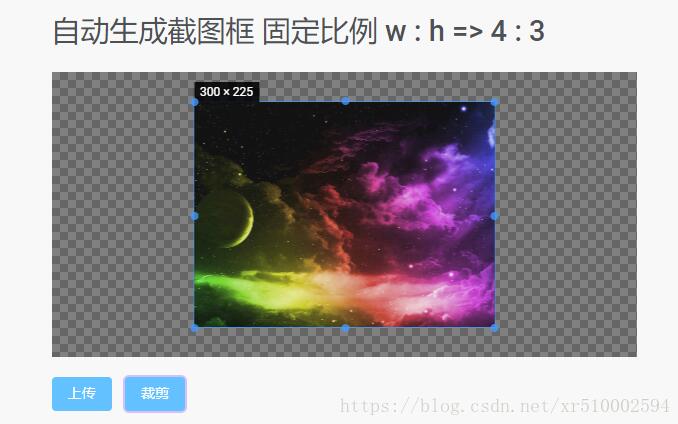
我在网上找了很多关于vue裁剪图片的文章,demo都太长了,实在是太长了。有些还都看不懂,最后还是用了个大佬的demo,但是项目实践过程中还是有问题没解决。先介绍吧。效果是下面这样的,

我这里采用了4:3的固定比例进行裁剪,裁剪后的效果

但是裁剪后的图片路径是base64,超级长的路径,最终还是需要处理地址传给后端的,项目用oss处理图片,最终获得一个类似于aad68a8fd577464dbcdead2e9b20084d这个的后缀传给后端,base64的路径有几万几十万个字符,传给后端会炸的吧。

后来我通过oss进行处理,把base64的路径地址变成通过oss解析过的地址,但是!解析过的地址让我下载,下载的文件不是图片格式,记事本打开文件里面还是base64的路径,复制粘贴,没错,是裁剪之后的图片,这个问题暂时还没有解决,解决之后进行再回来修改。先附上代码吧。这里代码是比较全的,图片地址解析那一部分可以不用。

以上问题以解决,base64转成blob格式就可以处理了,oss上传需要使用new Blob格式(2019/6/22更新)

另外附上文档

裁剪的vue文件:(已更新)

先下载npm install vue-cropper --save

?

1

2

3

4

5

6

7

8

9

10

11

12

13

14

15

16

17

18

19

20

21

22

23

24

25

26

27

28

29

30

31

32

33

34

35

36

37

38

39

40

41

42

43

44

45

46

47

48

49

50

51

52

53

54

55

56

57

58

59

60

61

62

63

64

65

66

67

68

69

70

71

72

73

74

75

76

77

78

79

80

81

82

83

84

85

86

87

88

89

90

91

92

93

94

95

96

97

98

99

100

101

102

103

104

105

106

107

108

109

110

111

112

113

114

115

116

117

118

119

120

121

122

123

124

125

126

127

128

129

130

131

132

133

134

135

136

137

138

139

140

141

142

143

144

145

146

147

148

149

150

151

152

153

154

155

156

157

158

159

160

161

162

163

164

165

166

167

168

169

170

171

172

173

174

175

176

177

178

179

180

181

182

183

184

185

186

187

188

189

190

191

192

193

194

195

196

197

198

199

200

201

202

203

204

205

206

207

208

209

210

211

212

213

214

215

216

217

218

219

220

221

222

223

224

225

226

227

228

229

230

231

232

233

234

235

236

237

238

239

240

241

242

243

244

245

246

247

248

249

250

251

252

253

254

255

256

257

258

259

260

261

262

263

264

265

266

267

268

269

270

271

272

273

274

275

276

277

278

279

280

281

282

283

284

285

286

287

288

289

<!-- 裁剪图片 -->

<template>

<div class="wrapper">

<div class="model" v-show="model" @click="model = false">

<div class="model-show">

<img :src="modelSrc" alt="">

</div>

</div>

<div class="content">

<div class="show-info">

<h2>自动生成截图框 固定比例 w : h => 4 : 3</h2>

<div class="test">

<vueCropper ref="cropper2" :img="example2.img " :outputSize="example2.size" :outputType="example2.outputType"

:info="example2.info" :canScale="example2.canScale" :autoCrop="example2.autoCrop"

:autoCropWidth="example2.autoCropWidth" :autoCropHeight="example2.autoCropHeight" :fixed="example2.fixed"

:fixedNumber="example2.fixedNumber" :enlarge="4"></vueCropper>

</div>

<label class="btn" for="upload2">上传</label>

<input type="file" id="upload2" style="position:absolute; clip:rect(0 0 0 0);"

accept="image/png, image/jpeg, image/gif, image/jpg" @change="uploadImg($event,2)">

<button @click="finish2()" class="btn">裁剪</button>

</div>

</div>

</div>

</template>

<script>

import { VueCropper } from 'vue-cropper'

import * as OSS from 'ali-oss';

export default {

components: {

VueCropper,

},

data() {

return {

model: false,

modelSrc: '',

crap: false,

previews: {},

form: {

head: ''

},

example2: {

//img的路径自行修改

img: '$oss.url + \'/\' + form.head ',

info: true,

size: 1,

outputType: 'jpeg',

canScale: true,

autoCrop: true,

// 只有自动截图开启 宽度高度才生效

autoCropWidth: 300,

autoCropHeight: 250,

fixed: true,

// 真实的输出宽高

infoTrue: true,

fixedNumber: [4, 3]

},

downImg: '#'

}

},

methods: {

//点击裁剪,这一步是可以拿到处理后的地址

finish2() {

this.$refs.cropper2.getCropData((data) => {

this.modelSrc = data

this.model = false;

//裁剪后的图片显示

this.example2.img = this.modelSrc;

// this.toBlob(data)

// console.log(data)

// console.log(this.toBlob(data))

//阿里云处理图片,项目的接口,这里可以不用,上面的地址打印即为base64的地址

this.$api.admin.url(data => {

new OSS.Wrapper({

region: "oss-cn-hangzhou",

accessKeyId: data.accessKeyId,

accessKeySecret: data.accessKeySecret,

stsToken: data.securityToken,

// bucket: 'mybg'c

bucket: 'zhiyuan-hz'

})

.put(data.key, this.toBlob(this.example2.img))

.then(data => {

console.log(data.url)

})

.catch(function (err) {

console.error("error: %j", err);

});

});

})

},

uploadImg(e, num) {

//上传图片

this.example2.img = ''

var file = e.target.files[0]

if (!/\.(gif|jpg|jpeg|png|bmp|GIF|JPG|PNG)$/.test(e.target.value)) {

alert('图片类型必须是.gif,jpeg,jpg,png,bmp中的一种')

return false

}

var reader = new FileReader()

reader.onload = (e) => {

let data

data = e.target.result

if (typeof e.target.result === 'object') {

// 把Array Buffer转化为blob 如果是base64不需要

data = window.URL.createObjectURL(new Blob([e.target.result]))

} else {

data = e.target.result

}

if (num === 1) {

this.option.img = data

} else if (num === 2) {

this.example2.img = data

}

}

// 转化为base64

// reader.readAsDataURL(file)

// 转化为blobcs

reader.readAsArrayBuffer(file)

},

// base64转blob

toBlob(ndata) {

//ndata为base64格式地址

console.log(ndata)

let arr = ndata.split(','),

mime = arr[0].match(/:(.*?);/)[1],

bstr = atob(arr[1]),

n = bstr.length,

u8arr = new Uint8Array(n);

while (n--) {

u8arr[n] = bstr.charCodeAt(n);

}

return new Blob([u8arr], {

type: mime

})

}

},

}

</script>

<style>

* {

margin: 0;

padding: 0;

}

.content {

margin: auto;

max-width: 585px;

margin-bottom: 100px;

}

.test-button {

display: flex;

flex-wrap: wrap;

}

.btn {

display: inline-block;

line-height: 1;

white-space: nowrap;

cursor: pointer;

background: #fff;

border: 1px solid #c0ccda;

color: #1f2d3d;

text-align: center;

box-sizing: border-box;

outline: none;

margin: 20px 10px 0px 0px;

padding: 9px 15px;

font-size: 14px;

border-radius: 4px;

color: #fff;

background-color: #50bfff;

border-color: #50bfff;

transition: all .2s ease;

text-decoration: none;

user-select: none;

}

.des {

line-height: 30px;

}

code.language-html {

padding: 10px 20px;

margin: 10px 0px;

display: block;

background-color: #333;

color: #fff;

overflow-x: auto;

font-family: Consolas, Monaco, Droid, Sans, Mono, Source, Code, Pro, Menlo, Lucida, Sans, Type, Writer, Ubuntu, Mono;

border-radius: 5px;

white-space: pre;

}

.show-info {

margin-bottom: 50px;

}

.show-info h2 {

line-height: 50px;

}

/*.title, .title:hover, .title-focus, .title:visited {

color: black;

}*/

.title {

display: block;

text-decoration: none;

text-align: center;

line-height: 1.5;

margin: 20px 0px;

background-image: -webkit-linear-gradient(left, #3498db, #f47920 10%, #d71345 20%, #f7acbc 30%, #ffd400 40%, #3498db 50%, #f47920 60%, #d71345 70%, #f7acbc 80%, #ffd400 90%, #3498db);

color: transparent;

-webkit-background-clip: text;

background-size: 200% 100%;

animation: slide 5s infinite linear;

font-size: 40px;

}

.test {

height: 285px;

}

.model {

position: fixed;

z-index: 10;

width: 100vw;

height: 100vh;

overflow: auto;

top: 0;

left: 0;

background: rgba(0, 0, 0, 0.8);

}

.model-show {

display: flex;

justify-content: center;

align-items: center;

width: 100vw;

height: 100vh;

}

.model img {

display: block;

margin: auto;

max-width: 80%;

user-select: none;

background-position: 0px 0px, 10px 10px;

background-size: 20px 20px;

background-image: linear-gradient(45deg, #eee 25%, transparent 25%, transparent 75%, #eee 75%, #eee 100%), linear-gradient(45deg, #eee 25%, white 25%, white 75%, #eee 75%, #eee 100%);

}

.c-item {

display: block;

padding: 10px 0;

user-select: none;

}

@keyframes slide {

0% {

background-position: 0 0;

}

100% {

background-position: -100% 0;

}

}

@media screen and (max-width: 1000px) {

.content {

max-width: 90%;

margin: auto;

}

.test {

height: 400px;

}

}

</style>

以上就是本文的全部内容,希望对大家的学习有所帮助,也希望大家多多支持服务器之家。

原文链接:https://blog.csdn.net/xr510002594/article/details/82876234

本文链接:https://my.lmcjl.com/post/9682.html

展开阅读全文

4 评论

留下您的评论.