介绍
Google出了一个开源的、跨平台的、可定制化的机器学习解决方案工具包,给在线流媒体(当然也可以用于普通的视频、图像等)提供了机器学习解决方案。感兴趣的同学可以打开这个网址了解详情:https://mediapipe.dev/。它提供了手势、人体姿势、人脸、物品等识别和追踪功能,并提供了C++、Python、JavaScript等编程语言的工具包以及iOS、Android平台的解决方案,今天我们就来看一下如何使用MediaPipe提供的人体姿势识别功能,使用Python编程完成一个“仰卧起坐检测”的程序。
准备工作
- 安装Python3.8.x
- 创建一个Python项目,建议使用virtualenv创建一个项目专有的Python环境
- 安装包:Opencv-Python、mediapipe、numpy
开始编程
- 创建一个人体姿势识别模块,在这个模块中,我们使用mediapipe模块来实现人体姿势识别,并获取姿势数据。
import cv2
import mediapipe as mp
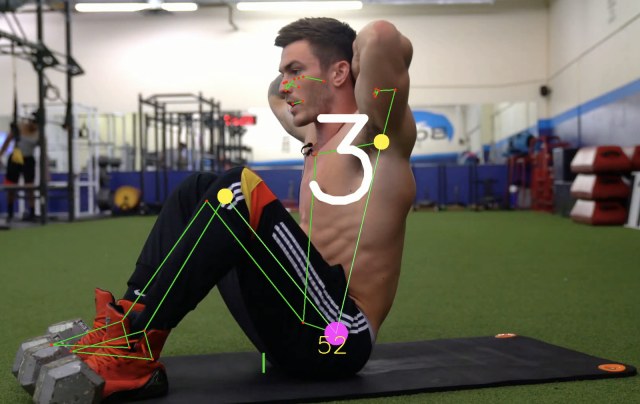
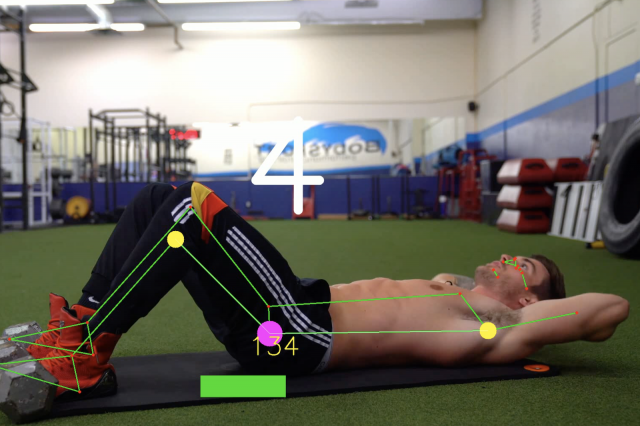
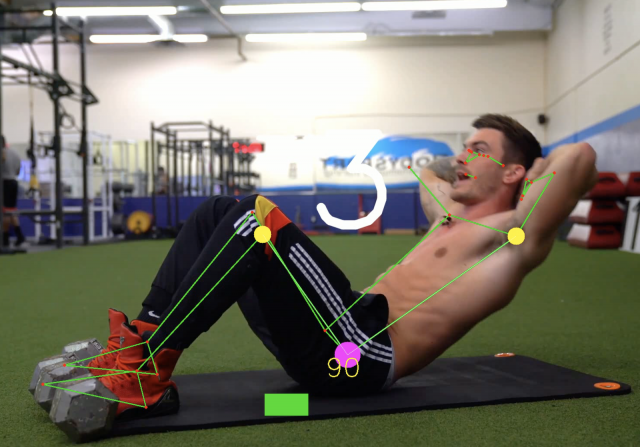
import mathclass PoseDetector():'''人体姿势检测类'''def __init__(self,static_image_mode=False,upper_body_only=False,smooth_landmarks=True,min_detection_confidence=0.5,min_tracking_confidence=0.5):'''初始化:param static_image_mode: 是否是静态图片,默认为否:param upper_body_only: 是否是上半身,默认为否:param smooth_landmarks: 设置为True减少抖动:param min_detection_confidence:人员检测模型的最小置信度值,默认为0.5:param min_tracking_confidence:姿势可信标记的最小置信度值,默认为0.5'''self.static_image_mode = static_image_modeself.upper_body_only = upper_body_onlyself.smooth_landmarks = smooth_landmarksself.min_detection_confidence = min_detection_confidenceself.min_tracking_confidence = min_tracking_confidence# 创建一个Pose对象用于检测人体姿势self.pose = mp.solutions.pose.Pose(self.static_image_mode, self.upper_body_only, self.smooth_landmarks,self.min_detection_confidence, self.min_tracking_confidence)def find_pose(self, img, draw=True):'''检测姿势方法:param img: 一帧图像:param draw: 是否画出人体姿势节点和连接图:return: 处理过的图像'''imgRGB = cv2.cvtColor(img, cv2.COLOR_BGR2RGB)# pose.process(imgRGB) 会识别这帧图片中的人体姿势数据,保存到self.results中self.results = self.pose.process(imgRGB)if self.results.pose_landmarks:if draw:mp.solutions.drawing_utils.draw_landmarks(img, self.results.pose_landmarks,mp.solutions.pose.POSE_CONNECTIONS)return imgdef find_positions(self, img):'''获取人体姿势数据:param img: 一帧图像:param draw: 是否画出人体姿势节点和连接图:return: 人体姿势数据列表'''# 人体姿势数据列表,每个成员由3个数字组成:id, x, y# id代表人体的某个关节点,x和y代表坐标位置数据self.lmslist = []if self.results.pose_landmarks:for id, lm in enumerate(self.results.pose_landmarks.landmark):h, w, c = img.shapecx, cy = int(lm.x * w), int(lm.y * h)self.lmslist.append([id, cx, cy])return self.lmslistdef find_angle(self, img, p1, p2, p3, draw=True):'''获取人体姿势中3个点p1-p2-p3的角度:param img: 一帧图像:param p1: 第1个点:param p2: 第2个点:param p3: 第3个点:param draw: 是否画出3个点的连接图:return: 角度'''x1, y1 = self.lmslist[p1][1], self.lmslist[p1][2]x2, y2 = self.lmslist[p2][1], self.lmslist[p2][2]x3, y3 = self.lmslist[p3][1], self.lmslist[p3][2]# 使用三角函数公式获取3个点p1-p2-p3,以p2为角的角度值,0-180度之间angle = int(math.degrees(math.atan2(y1 - y2, x1 - x2) - math.atan2(y3 - y2, x3 - x2)))if angle < 0:angle = angle + 360if angle > 180:angle = 360 - angleif draw:cv2.circle(img, (x1, y1), 20, (0, 255, 255), cv2.FILLED)cv2.circle(img, (x2, y2), 30, (255, 0, 255), cv2.FILLED)cv2.circle(img, (x3, y3), 20, (0, 255, 255), cv2.FILLED)cv2.line(img, (x1, y1), (x2, y2), (255, 255, 255, 3))cv2.line(img, (x2, y2), (x3, y3), (255, 255, 255, 3))cv2.putText(img, str(angle), (x2 - 50, y2 + 50), cv2.FONT_HERSHEY_SIMPLEX, 2, (0, 255, 255), 2)return angle- 编写situps.py,在这个程序中我们将使用opencv读取视频文件,当然你也可以使用摄像头直接拍摄。调用人体姿势识别模块进行视频中人体姿势识别并获取姿势数据,通过人体姿势中3个位置点的数据:肩膀(11)、臀部(23)、膝盖(25),计算这3个点的角度,判断仰卧起坐是否达标。
# 导入opencv工具包
import cv2
# 导入numpy
import numpy as np
# 导入姿势识别器
from poseutil import PoseDetector# 打开视频文件
cap = cv2.VideoCapture('videos/situp.mp4')
# 姿势识别器
detector = PoseDetector()# 方向与个数
dir = 0  # 0为躺下,1为坐起
count = 0while True:# 读取摄像头,img为每帧图片success, img = cap.read()if success:h, w, c = img.shape# 识别姿势img = detector.find_pose(img, draw=True)# 获取姿势数据positions = detector.find_positions(img)if positions:# 获取仰卧起坐的角度angle = detector.find_angle(img, 11, 23, 25)# 进度条长度bar = np.interp(angle, (50, 130), (w // 2 - 100, w // 2 + 100))cv2.rectangle(img, (w // 2 - 100, h - 150), (int(bar), h - 100), (0, 255, 0), cv2.FILLED)# 角度小于55度认为坐起if angle <= 55:if dir == 0:count = count + 0.5dir = 1# 角度大于120度认为躺下if angle >= 120:if dir == 1:count = count + 0.5dir = 0cv2.putText(img, str(int(count)), (w // 2, h // 2), cv2.FONT_HERSHEY_SIMPLEX, 10, (255, 255, 255), 20, cv2.LINE_AA)# 打开一个Image窗口显示视频图片cv2.imshow('Image', img)else:# 视频结束退出break# 如果按下q键,程序退出key = cv2.waitKey(1)if key == ord('q'):break# 关闭摄像头
cap.release()
# 关闭程序窗口
cv2.destroyAllWindows()
运行测试
总体感觉mediapipe识别率还是很不错的,在使用CPU的情况下基本上能达到25帧/秒。我们可以通过调整仰卧起坐的判断角度来使这个程序更符合你自己的仰卧起坐检测。
本文链接:https://my.lmcjl.com/post/14074.html
展开阅读全文
4 评论