一、环境准备
- 安装RabbitMq
安装可查看另外文章本文就不做介绍了.
本文使用的erl和RabbitMQ版本分别是10.4和3.7.15
二、进入正题
1.创建SpringBoot项目
1.1、生产者
- pom.xml——maven依赖
<?xml version="1.0" encoding="UTF-8"?>
<project xmlns="http://maven.apache.org/POM/4.0.0" xmlns:xsi="http://www.w3.org/2001/XMLSchema-instance"xsi:schemaLocation="http://maven.apache.org/POM/4.0.0 https://maven.apache.org/xsd/maven-4.0.0.xsd"><modelVersion>4.0.0</modelVersion><parent><groupId>org.springframework.boot</groupId><artifactId>spring-boot-starter-parent</artifactId><version>1.5.4.RELEASE</version><relativePath/> <!-- lookup parent from repository --></parent><groupId>com.test.producer</groupId><artifactId>test-producer</artifactId><version>0.0.1-SNAPSHOT</version><name>com.test.producer</name><description>Demo project for Spring Boot</description><properties><java.version>1.8</java.version><spring-cloud.version>Dalston.SR1</spring-cloud.version></properties><dependencies><dependency><groupId>org.springframework.boot</groupId><artifactId>spring-boot-starter</artifactId></dependency><dependency><groupId>org.springframework.cloud</groupId><artifactId>spring-cloud-starter-stream-rabbit</artifactId></dependency><dependency><groupId>org.springframework.boot</groupId><artifactId>spring-boot-starter-web</artifactId></dependency><dependency><groupId>org.springframework.cloud</groupId><artifactId>spring-cloud-starter-openfeign</artifactId><version>1.4.6.RELEASE</version></dependency><dependency><groupId>com.alibaba.cloud</groupId><artifactId>spring-cloud-starter-alibaba-nacos-discovery</artifactId></dependency><dependency><groupId>org.slf4j</groupId><artifactId>slf4j-log4j12</artifactId></dependency><dependency><groupId>com.alibaba</groupId><artifactId>fastjson</artifactId><version>1.2.56</version></dependency><dependency><groupId>org.projectlombok</groupId><artifactId>lombok</artifactId><optional>true</optional></dependency><dependency><groupId>junit</groupId><artifactId>junit</artifactId></dependency><dependency><groupId>org.springframework.boot</groupId><artifactId>spring-boot-starter-test</artifactId><scope>test</scope><exclusions><exclusion><groupId>org.junit.vintage</groupId><artifactId>junit-vintage-engine</artifactId></exclusion></exclusions></dependency></dependencies><dependencyManagement><dependencies><dependency><groupId>org.springframework.cloud</groupId><artifactId>spring-cloud-dependencies</artifactId><version>${spring-cloud.version}</version><type>pom</type><scope>import</scope></dependency></dependencies></dependencyManagement><build><plugins><plugin><groupId>org.springframework.boot</groupId><artifactId>spring-boot-maven-plugin</artifactId></plugin></plugins></build>- 启动类
package com.test.producer;import com.test.producer.mq.TestOutTopic;
import org.springframework.boot.SpringApplication;
import org.springframework.boot.autoconfigure.SpringBootApplication;
import org.springframework.boot.autoconfigure.amqp.RabbitAutoConfiguration;
import org.springframework.cloud.stream.annotation.EnableBinding;@EnableBinding({TestOutTopic.class})
@SpringBootApplication
public class ProducerApplication {public static void main(String[] args) {SpringApplication.run(ProducerApplication.class, args);}}- application.properties——配置文件
spring.application.name=producer
server.port=10001
spring.rabbitmq.host=127.0.0.1
spring.rabbitmq.port=5672
spring.rabbitmq.username=guest
spring.rabbitmq.password=guest
# ===发布主题===
# destination属性定义发布主题 ,对应的rabbitmq的Exchanges
spring.cloud.stream.bindings.generate_can_withdraw_amount.destination=GENERATE_CAN_WITHDRAW_AMOUNT
# content-type属性定义消息体的格式,建议都用json
spring.cloud.stream.bindings.generate_can_withdraw_amount.content-type=application/json- TestOutTopic.java——统一定义消息主题的接口
package com.test.producer.mq;import org.springframework.cloud.stream.annotation.Output;
import org.springframework.messaging.MessageChannel;public interface TestOutTopic {/*** 注意:这里的值要跟配置文件中的主题一致*/String GENERATE_CAN_WITHDRAW_AMOUNT = "generate_can_withdraw_amount";@Output(GENERATE_CAN_WITHDRAW_AMOUNT)MessageChannel generateCanWithdrawAmountOutput();
}- SendService.java——统一消息发送.发送消息注入该Service即可
package com.test.producer.service;public interface SendService {void sendCanWithdrawAmount(String message);
}- SendServiceImpl.java——统一消息发送实现类
package com.test.producer.service.impl;import com.test.producer.mq.TestOutTopic;
import com.test.producer.service.SendService;
import org.springframework.beans.factory.annotation.Autowired;
import org.springframework.context.annotation.Primary;
import org.springframework.messaging.support.MessageBuilder;
import org.springframework.stereotype.Service;@Service
@Primary
public class SendServiceImpl implements SendService {private final TestOutTopic topic;@Autowiredpublic SendServiceImpl(TestOutTopic topic) {this.topic = topic;}@Overridepublic void sendCanWithdrawAmount(String message){topic.generateCanWithdrawAmountOutput().send(MessageBuilder.withPayload(message).build());}
}
- WebController.java——使用controller来测试.后续业务有变更直接注入SendService即可
package com.test.producer.controller;import com.test.producer.clients.Consumer;
import com.test.producer.service.SendService;
import lombok.extern.slf4j.Slf4j;
import org.springframework.beans.factory.annotation.Autowired;
import org.springframework.http.ResponseEntity;
import org.springframework.web.bind.annotation.GetMapping;
import org.springframework.web.bind.annotation.RequestParam;
import org.springframework.web.bind.annotation.RestController;import javax.servlet.http.HttpServletRequest;
import javax.servlet.http.HttpSession;@RestController
@Slf4j
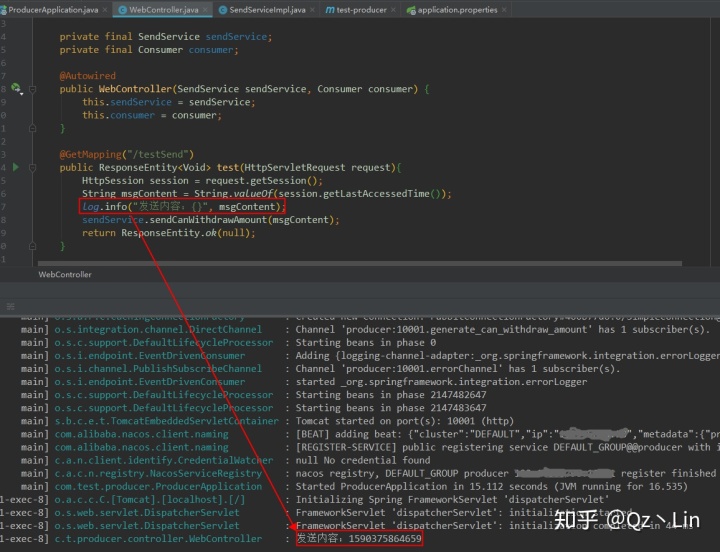
public class WebController {private final SendService sendService;@Autowiredpublic WebController(SendService sendService) {this.sendService = sendService;}@GetMapping("/testSend")public ResponseEntity<Void> test(HttpServletRequest request){HttpSession session = request.getSession();String msgContent = String.valueOf(session.getLastAccessedTime());log.info("发送内容:{}", msgContent);sendService.sendCanWithdrawAmount(msgContent);return ResponseEntity.ok(null);}1.2、消费者
- pom.xml
<?xml version="1.0" encoding="UTF-8"?>
<project xmlns="http://maven.apache.org/POM/4.0.0" xmlns:xsi="http://www.w3.org/2001/XMLSchema-instance"xsi:schemaLocation="http://maven.apache.org/POM/4.0.0 https://maven.apache.org/xsd/maven-4.0.0.xsd"><modelVersion>4.0.0</modelVersion><parent><groupId>org.springframework.boot</groupId><artifactId>spring-boot-starter-parent</artifactId><version>1.5.4.RELEASE</version><relativePath/> <!-- lookup parent from repository --></parent><groupId>com.linsy.consumer</groupId><artifactId>linsy-consumer</artifactId><version>0.0.1-SNAPSHOT</version><description>Demo project for Spring Boot</description><properties><java.version>1.8</java.version><spring-cloud.version>Dalston.SR1</spring-cloud.version></properties><dependencies><dependency><groupId>org.springframework.boot</groupId><artifactId>spring-boot-starter</artifactId></dependency><dependency><groupId>org.springframework.cloud</groupId><artifactId>spring-cloud-starter-stream-rabbit</artifactId></dependency><dependency><groupId>org.springframework.boot</groupId><artifactId>spring-boot-starter-aop</artifactId></dependency><dependency><groupId>org.slf4j</groupId><artifactId>slf4j-log4j12</artifactId></dependency><dependency><groupId>com.alibaba</groupId><artifactId>fastjson</artifactId><version>1.2.56</version></dependency><dependency><groupId>org.projectlombok</groupId><artifactId>lombok</artifactId><optional>true</optional></dependency><dependency><groupId>org.springframework.boot</groupId><artifactId>spring-boot-starter-test</artifactId><scope>test</scope><exclusions><exclusion><groupId>org.junit.vintage</groupId><artifactId>junit-vintage-engine</artifactId></exclusion></exclusions></dependency></dependencies><dependencyManagement><dependencies><dependency><groupId>org.springframework.cloud</groupId><artifactId>spring-cloud-dependencies</artifactId><version>${spring-cloud.version}</version><type>pom</type><scope>import</scope></dependency></dependencies></dependencyManagement><build><plugins><plugin><groupId>org.springframework.boot</groupId><artifactId>spring-boot-maven-plugin</artifactId></plugin></plugins></build></project>- application.properties
spring.application.name=consumer
server.port=10010
spring.rabbitmq.host=127.0.0.1
spring.rabbitmq.port=5672
spring.rabbitmq.username=guest
spring.rabbitmq.password=guest#发布主题
# destination属性定义目标主题 ,对应的rabbitmq的Exchanges
spring.cloud.stream.bindings.generate_can_withdraw_amount.destination=GENERATE_CAN_WITHDRAW_AMOUNT
# content-type属性定义消息体的格式
spring.cloud.stream.bindings.generate_can_withdraw_amount.content-type=application/json
# 接收组,如果有其它组也要消费该消息.修改组名即可
spring.cloud.stream.bindings.generate_can_withdraw_amount.group=consumer- 启动类
package com.test.consumer;import com.linsy.consumer.mq.TestInTopic;
import org.springframework.boot.SpringApplication;
import org.springframework.boot.autoconfigure.SpringBootApplication;
import org.springframework.boot.autoconfigure.amqp.RabbitAutoConfiguration;
import org.springframework.cloud.stream.annotation.EnableBinding;@EnableBinding(TestInTopic.class)
@SpringBootApplication
public class ConsumerApplication {public static void main(String[] args) {SpringApplication.run(ConsumerApplication.class, args);}}- TestInTopic.java
package com.test.consumer.mq;import org.springframework.cloud.stream.annotation.Input;
import org.springframework.messaging.SubscribableChannel;public interface TestInTopic {String GENERATE_CAN_WITHDRAW_AMOUNT = "generate_can_withdraw_amount";@Input(GENERATE_CAN_WITHDRAW_AMOUNT)SubscribableChannel generateCanWithdrawAmountInput();
}- 接收广播
package com.test.consumer.mq.receive;import com.linsy.consumer.mq.TestInTopic;
import lombok.extern.slf4j.Slf4j;
import org.springframework.beans.factory.annotation.Value;
import org.springframework.cloud.stream.annotation.StreamListener;
import org.springframework.stereotype.Component;@Component
@Slf4j
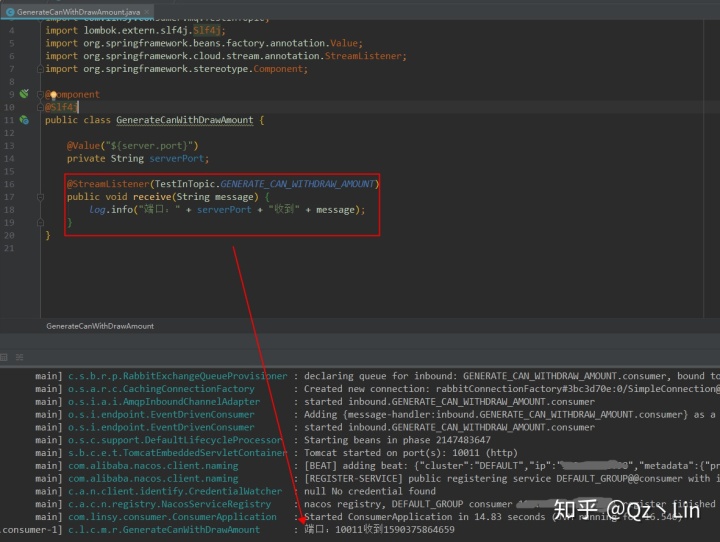
public class GenerateCanWithDrawAmount {@Value("${server.port}")private String serverPort;@StreamListener(TestInTopic.GENERATE_CAN_WITHDRAW_AMOUNT)public void receive(String message) {log.info("端口:" + serverPort + "收到" + message);}
}三、测试
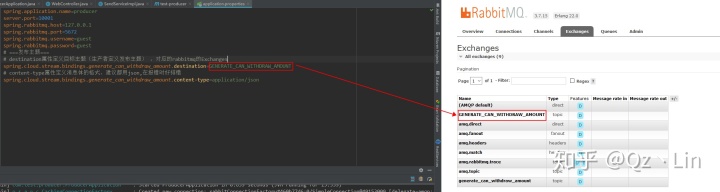
项目启动后,登陆UI界面可以看到我们配置好的Exchanges
使用postman请求我们前面配置的controller中的URL

发现请求已经进入
配置的消费者也能正常消费消息
如对您有帮助,请多多转发给您身边需要的人。O(∩_∩)O
本文链接:https://my.lmcjl.com/post/9142.html
展开阅读全文
4 评论