1前言
最近AI很火🔥,先是AI画图,然后就ChatGPT,后者我已经用了一段时间了,用来写作文挺不错的,但OpenAI屏蔽了中国IP,加上用户太多啥的,用起来没那么爽,但没办法全球只此一家,只能捏着鼻子用。而AI画图就不一样了,全是开源的,自己部署一下可以玩个爽~
正好我们这有台2080Ti的工作站,之前用来训练模型的,现在部署个画图应该轻轻松松,于是就开始了折腾之路~
2效果
先看看我生成出来的一些图片
| 汉服 | COSER |
|---|---|
 |  |
| 大海 | 2B小姐姐 |
 |  |
3Stable Diffusion
AI画图有 Novel AI 、Disco Diffusion、Stable Diffusion 等模型,为了快速上手,我选择了最简单的 Stable Diffusion ~
Stable Diffusion 是一个「文本到图像」的人工智能模型(AI 绘图工具),开源且能部署在家用电脑(对硬件要求不高)上。使用 Stable Diffusion,你可以在拥有 6GB 显存显卡,16GB 内存或只依赖 CPU 的电脑上生成图像,并且仅需几秒钟的时间,无需进行预处理或后处理。
GitHub上有个项目可以快速将 Stable Diffusion 用 docker 跑起来,还附带了 UI 界面,方便得很,本文用的就是这个项目。
项目地址: https://github.com/AbdBarho/stable-diffusion-webui-docker
4前置条件
Linux系统(炼丹绕不开的,推荐Ubuntu系;Windows可以借助WSL,但折腾)
NVIDIA显卡,6G以上显存(当然AMD显卡或者没显卡用CPU跑也行,但不在本文讨论范围)
CUDA版本 11.6 以上
通畅的网络(能够正常访问GitHub、下载模型)
5配置docker网络
安装这个 Stable Diffusion 模型,需要下载很多模型,单纯基础模型和数据就得十几个GB,这些都是要从国外的服务器下载,所以为了安装顺利,先来配置一下docker的代理。
Dockerd 代理
在执行docker pull时,是由守护进程dockerd来执行。因此,代理需要配在dockerd的环境中。而这个环境,则是受systemd所管控,因此实际是systemd的配置。
sudo mkdir -p /etc/systemd/system/docker.service.d
sudo touch /etc/systemd/system/docker.service.d/proxy.conf
在这个 proxy.conf 文件(可以是任意 *.conf 的形式)中,添加以下内容:
[Service]
Environment="HTTP_PROXY=http://proxy.example.com:8080/"
Environment="HTTPS_PROXY=http://proxy.example.com:8080/"
Environment="NO_PROXY=localhost,127.0.0.1,.example.com"其中,proxy.example.com:8080 要换成可用的免密代理。
Container 代理
在容器运行阶段,如果需要代理上网,则需要配置 ~/.docker/config.json。以下配置,只在Docker 17.07及以上版本生效。
{"proxies": {"default": {"httpProxy": "http://proxy.example.com:8080","httpsProxy": "http://proxy.example.com:8080","noProxy": "localhost,127.0.0.1,.example.com"}}
}
这个是用户级的配置,除了 proxies,docker login 等相关信息也会在其中。
Docker Build 代理
虽然 docker build 的本质,也是启动一个容器,但是环境会略有不同,用户级配置无效。在构建时,需要注入 http_proxy 等参数。
如果是通过 docker 命令启动的容器,可以使用以下命令
docker build . \--build-arg "HTTP_PROXY=http://proxy.example.com:8080/" \--build-arg "HTTPS_PROXY=http://proxy.example.com:8080/" \--build-arg "NO_PROXY=localhost,127.0.0.1,.example.com" \-t your/image:tag不过我们一般使用 docker compose 工具,所以接着看看 compose 的配置方式
version: '3.9'
services:app:build: ./services/AUTOMATIC1111image: sd-auto:49environment:- CLI_ARGS=--allow-code --medvram --xformers --enable-insecure-extension-access --api
改成
version: '3.9'
services:app:build:context: ./services/AUTOMATIC1111args:- HTTP_PROXY=http://proxy.example.com:8080/- HTTPS_PROXY=http://proxy.example.com:8080/image: sd-auto:49environment:- CLI_ARGS=--allow-code --medvram --xformers --enable-insecure-extension-access --api
这样就搞定了~
Tips
配置完记得重启 docker daemon
sudo systemctl daemon-reload
sudo systemctl restart docker
6CUDA
推荐使用 LinuxMint/Ubuntu 系统自带的驱动管理器安装最新的显卡驱动。
系统方面之前用的是 LinuxMint18(基于Ubuntu16.04) ,看了下 NVIDIA 的官方网站,这系统太老了,已经没办法用上新版驱动和CUDA了,所以我又花了一下午时间把系统升级到 LinuxMint21(基于Ubuntu22.04),然后装上驱动,Ubuntu系装驱动真是方便,一键搞定,没有任何波折😃,而且驱动附带的 CUDA 也装上了,不用额外折腾,舒服了。
用 nvidia-smi 看看驱动信息
Thu Mar 30 21:39:45 2023
+-----------------------------------------------------------------------------+
| NVIDIA-SMI 525.89.02    Driver Version: 525.89.02    CUDA Version: 12.0     |
|-------------------------------+----------------------+----------------------+
| GPU  Name        Persistence-M| Bus-Id        Disp.A | Volatile Uncorr. ECC |
| Fan  Temp  Perf  Pwr:Usage/Cap|         Memory-Usage | GPU-Util  Compute M. |
|                               |                      |               MIG M. |
|===============================+======================+======================|
|   0  NVIDIA GeForce ...  Off  | 00000000:C1:00.0 Off |                  N/A |
|  0%   30C    P8    26W / 300W |   1350MiB / 11264MiB |      0%      Default |
|                               |                      |                  N/A |
+-------------------------------+----------------------+----------------------++-----------------------------------------------------------------------------+
| Processes:                                                                  |
|  GPU   GI   CI        PID   Type   Process name                  GPU Memory |
|        ID   ID                                                   Usage      |
|=============================================================================|
|    0   N/A  N/A      1394      G   /usr/lib/xorg/Xorg                114MiB |
|    0   N/A  N/A      3198      G   cinnamon                           38MiB |
|    0   N/A  N/A    508973      C   python                           1192MiB |
+-----------------------------------------------------------------------------+
CUDA版本是12,完美~😃
7搭建步骤
终于要开始搞了
先把代码 clone 下来
git clone https://github.com/AbdBarho/stable-diffusion-webui-docker.gitbuild step 1: 下载模型,需要十几个G的模型
(只要网络通畅,一次搞定没问题的)
cd stable-diffusion-webui-docker
docker compose --profile download up --build
build step 2: 运行本体
这里是选择一套 UI 来启动,这个 auto 就是 UI 的名称,除了这个,还有 auto-cpu (没显卡用的)、 invoke 、sygil 这几个,我试了之后还是 auto 最好,功能最多。
invoke 的界面比较简洁,似乎速度也比较快,但很多模型和LORA之类的都没法用了~😑
直接 auto 吧,不要纠结
docker compose --profile auto up --build驱动、网络没问题的话,等它构建完可以看到类似的信息
stable-diffusion-webui-docker-auto-1  | Creating model from config: /stable-diffusion-webui/configs/v1-inference.yaml
stable-diffusion-webui-docker-auto-1  | LatentDiffusion: Running in eps-prediction mode
stable-diffusion-webui-docker-auto-1  | DiffusionWrapper has 859.52 M params.
stable-diffusion-webui-docker-auto-1  | Applying xformers cross attention optimization.
stable-diffusion-webui-docker-auto-1  | Textual inversion embeddings loaded(1): pureerosface_v1
stable-diffusion-webui-docker-auto-1  | Model loaded in 41.4s (calculate hash: 38.2s, load weights from disk: 1.6s, create model: 0.3s, apply weights to model: 0.3s, apply half(): 0.2s, load VAE: 0.8s).
stable-diffusion-webui-docker-auto-1  | Running on local URL:  http://0.0.0.0:7860
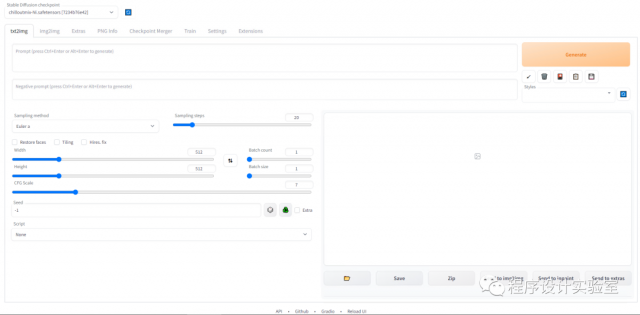
然后浏览器打开 http://ip:7860 就可以看到这个界面

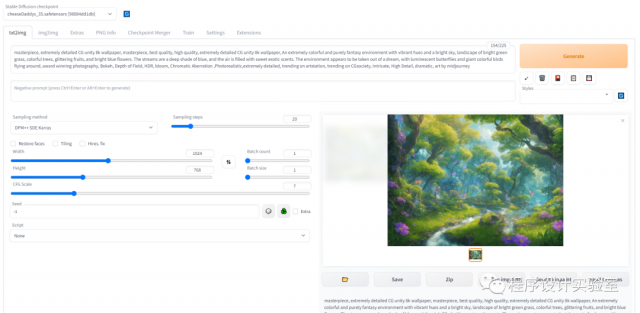
输入 prompt 就可以画图了,这里我用了一个风光图的模型,画一幅风景画

如果跑不起来也没事,可以看看后面的「疑难解答」部分。
8如何使用
刚开始肯定一脸懵逼,咋画不出高大上的效果啊?
prompt
模型
首先,得学会使用 prompt,也就是生成图片的描述,Stable Diffusion 通过英文文字内容来描述场景或物体,以此来决定生成的图像中会出现什么。文字描述是决定图像生成质量的关键因素。具体如何写 prompt 不在本文讨论范围,请自行搜索相关文章,网上很多。
模型是个统称,其中包含了Checkpoints、LORA、Texture之类的,不细说了,按照模型网站上的教程安装使用就行。
这几个网站可以按提示组合生成 prompt:
https://promptomania.com/stable-diffusion-prompt-builder/
https://weirdwonderfulai.art/resources/disco-diffusion-modifiers/
这几个网站有很多人分享的成品图和描述文案:
https://prompthero.com/
https://openart.ai/
然后模型的话,可以去这几个网站下载:
https://civitai.com/
https://huggingface.co/
9疑难解答
failed to solve: rpc error:
报错信息
failed to solve: rpc error: code = Unknown desc = failed to solve with frontend dockerfile.v0: failed to solve with frontend gateway.v0: rpc error: code = Unknown desc = dockerfile parse error on line 8: unknown instruction: cat (did you mean cmd?)解决方案
https://github.com/AbdBarho/stable-diffusion-webui-docker/issues/190
修改 stable-diffusion-webui-docker/services/AUTOMATIC1111/Dockerfile
将第一行
# syntax=docker/dockerfile:1改为
# syntax=docker/dockerfile:1.3-labs然后加上 DOCKER_BUILDKIT=1 参数进行 build
DOCKER_BUILDKIT=1 docker compose --profile auto up --buildpip依赖安装失败
网络问题,虽然前面已经配置好了 docker 的代理,但 build 过程中不会走配置好的代理,需要添加 build args 再配置一次。
在 docker compose 配置中添加 build args 配置代理服务器。
参考文档: https://docs.docker.com/compose/compose-file/compose-file-v3/
修改 docker-compose.yml 文件
auto: &automatic<<: *base_serviceprofiles: ["auto"]build: ./services/AUTOMATIC1111image: sd-auto:49environment:- CLI_ARGS=--allow-code --medvram --xformers --enable-insecure-extension-access --api改为
auto: &automatic<<: *base_serviceprofiles: ["auto"]build:context: ./services/AUTOMATIC1111args:- HTTP_PROXY=http://host:port/- HTTPS_PROXY=http://host:port/image: sd-auto:49environment:- CLI_ARGS=--allow-code --medvram --xformers --enable-insecure-extension-access --api显卡驱动问题
报错信息
Error response from daemon: could not select device driver "nvidia" with capabilities: [[gpu]]需要安装 NVIDIA Container Toolkit
参考文档: https://docs.nvidia.com/datacenter/cloud-native/container-toolkit/install-guide.html#setting-up-nvidia-container-toolkit
添加软件源
distribution=$(. /etc/os-release;echo $ID$VERSION_ID) \&& curl -fsSL https://nvidia.github.io/libnvidia-container/gpgkey | sudo gpg --dearmor -o /usr/share/keyrings/nvidia-container-toolkit-keyring.gpg \&& curl -s -L https://nvidia.github.io/libnvidia-container/$distribution/libnvidia-container.list | \sed 's#deb https://#deb [signed-by=/usr/share/keyrings/nvidia-container-toolkit-keyring.gpg] https://#g' | \sudo tee /etc/apt/sources.list.d/nvidia-container-toolkit.list注意如果是使用 LinuxMint 之类的 Ubuntu 衍生版,请手动指定 distribution 环境变量为对应的 Ubuntu 发行版,比如我现在用的 Mint 21 相当于 Ubuntu 22.04,所以需要设置 distribution=ubuntu22.04
安装
sudo apt install -y nvidia-container-toolkit配置
sudo nvidia-ctk runtime configure --runtime=docker重启 docker daemon
sudo systemctl restart docker10参考资料
项目地址 - https://github.com/AbdBarho/stable-diffusion-webui-docker
基础入门博客 - https://newzone.top/posts/2022-09-05-stable_diffusion_ai_painting.html
本文链接:https://my.lmcjl.com/post/14157.html

4 评论