文章目录
- 1. COCO数据集
- 1.1 COCO数据集介绍
- 1.2 COCO数据集格式
- 1.2.1 常见目标检测数据格式
- 1.2.2 COCO数据集文件结构及标注文件说明
- 1.2.3 COCO的evaluation指标
- 1.3 其他
- 2. pycocotools
- 2.1 pycocotools简介和安装
- 2.2 基本使用
- 3. 图像的EXIF使用
- 3.1 图像的EXIF
- 3.1.1 基本介绍
- 3.1.2 JEPG等格式说明
- 3.1.3 EXIF属性和对应code
- 3.1.4 EXIF中的key和value意义(EXIF Tags)
- 3.1.5 借助EXIF信息处理图像的意义
- 3.2 使用PIL借助EXIF校正图像旋转
- 3.2.0 PIL支持的EXIF Tags
- 3.2.1 推荐简单的写法
- 3.2.2 朴实的写法
- 3.3 OpenCV中的EXIF信息问题
- 3.3.1 imread默认应用了EXIF
- 3.3.2 imread默认不应用EXIF
1. COCO数据集
参考:目标检测实战篇1——数据集介绍(PASCAL VOC,MS COCO)
现在说的COCO数据集一般指的就是2017年的数据集:图像一共25GB,看看就好了,肯定不会训练的。
| 图像 | 标注 |
|---|---|
| 2017 Train images [118K/18GB] | 2017 Train/Val annotations [241MB] |
| 2017 Val images [5K/1GB] | |
| 2017 Test images [41K/6GB] | 2017 Testing Image info [1MB] |
1.1 COCO数据集介绍
COCO是一个用于目标检测、分割和图像描述生成的大型数据集,有以下特点:
- 图像分割
- 上下文识别
- 超像素分割
- 33w图像,其中有标记的超过20w
- 150w目标实例
- 80个目标类别,这80个类别是做目标检测时的类别,详见:COCO Explorer,标注的不错,下图左上角的那些标签是可以点击的,会和下面的图像有交互效果。
- 91个物体类别:除了上面那确定对象的80个类别,还有天空、海洋等一些别的,不是目标检测类别,是全景分割等需要的内容。
- 每张图像5个情景描述,如上图
- 有25w人的关键点标注
1.2 COCO数据集格式
1.2.1 常见目标检测数据格式
- 一般目标检测任务使用
Pascal VOC,YOLO和COCO数据集格式, - 语义分割任务Pascal VOC和COCO都有,还有一些街景、遥感图像、医疗影像特定领域的格式,不是通用类的。
- 后续会另外介绍语义分割任务相关部分,这里只关注目标检测方面的
1.2.2 COCO数据集文件结构及标注文件说明
1. 基本的文件结构:
data
├─  annotations
│   ├─  instances_train2017.json
│   └─  instances_val2017.json
├─  train2017
│   ├─  000000000???.jpg
│   ├─  000000000???.jpg
│   └─  ...
└─  val2017├─  000000000???.jpg├─  000000000???.jpg└─  ...
参考: COCO with YOLO
2. 标注文件格式
标注文件以json格式存在,不是PASAL VOC那种一个xml对应一个文件标注,这里是所有图像的标注都存在于一个文件里,看下图左侧的行号:

具体点:
{"images": [{"id": 0,"file_name": "34020010494_e5cb88e1c4_k.jpg","height": 1536,"width": 2048}, //这是一个示例],//"images"字段结束"annotations": [{"image_id": 0,"id": 0,"category_id": 0,"bbox": [994,619,451,547],"area": 246697,"segmentation": [[1020.5,963.5,1000.5,...963.5]],"iscrowd": 0},//这是一个示例],//"annotations"字段结束"categories": [{"id": 0,"name": "balloon"}]//"annotations"字段结束
}
其遵循的数据格式参见:COCO-Data format。
- COCO有分别用于目标检测、关键点检测和实例分割、全景分割、姿态估计和图像描述生成的多种数据标注类型,这些标注都使用JSON格式存储。
- COCO API(例如:pycocotools)可以用于访问处理上面所有的标注,这些标注都遵循以下基本数据结构
- 上面展示的那个数据集没有
info字段和licenses字段,其他都是基本符合的
{"info": info,"images": [image],"annotations": [annotation],"licenses": [license],
}info{"year": int,"version": str,"description": str,"contributor": str,"url": str,"date_created": datetime,
}image{"id": int,"width": int,"height": int,"file_name": str,"license": int,"flickr_url": str,"coco_url": str,"date_captured": datetime,
}license{"id": int,"name": str,"url": str,
}
- 另外,针对不同类型,其
annotations字段一般不同,同时有些还会有categories字段,目标检测任务这两个字段的规范是:
annotation{"id": int,"image_id": int,"category_id": int,"segmentation": RLE or [polygon],"area": float,"bbox": [x,y,width,height],"iscrowd": 0 or 1,// iscrowd是1,表示要使用RLE
}categories[{"id": int,"name": str,"supercategory": str, // 比如 蓝猫的父类是猫咪,类别的层次}
]
这和上面的例子也是差不多的,这就是COCO的标注格式了。
1.2.3 COCO的evaluation指标
Evaluation指标: 参考 Metrics

截了个图,不做具体说明了
1.3 其他
除了COCO API,还有MASK API和FiftyOne
- MASK API:处理RLE格式存储的mask
- FiftyOne:开源的可视化和访问COCO的工具,也可以对COCO模型做可视化的评估
- 有兴趣可以看看:FIFTYONE
- 也提供了一个colab上的快速体验:quickstart.ipynb
2. pycocotools
2.1 pycocotools简介和安装
来源:cocoapi/PythonAPI/pycocotools/
- 其实就是个对json格式进行解析的库,就三个.py脚本,不要和
protobuf这个库搞混了,名字有一丢丢像(我之前以为这个库很难,就是和这个搞混了) - 简单到网上连个document都没有,直接自己安装看函数help吧
安装:
# windows下(直接pip需要编译,需要visual studio)
conda install pycocotools -c conda-forge# macos (也需要编译,但是macOS系统包含编译工具,不需要进行额外依赖安装)
pip install pycocotools
2.2 基本使用
主要就是以下几个函数(其中,“ann”=annotation, “cat”=category, “img”=image)
| 函数名称 | 功能 |
|---|---|
getAnnIds | 返回满足筛选条件的标注id |
getCatIds | 返回满足筛选条件的类别id |
getImgIds | 返回满足筛选条件的图像id |
loadAnns | 加载指定id的标注 |
loadCats | 加载指定id的类别 |
loadImgs | 加载指定id的图像 |
loadRes | eval评估模型效果时加载预测结果的 |
showAnns | 显示特定的标注 |
示例代码:上传到github了(jupyter),详见:openMMLabCampusLearn/selfExercise/1.pycocotools.ipynb
参考:
- 2. COCO API
- cocoapi/PythonAPI/pycocoDemo.ipynb
- cocoapi/PythonAPI/pycocoEvalDemo.ipynb
3. 图像的EXIF使用
这部分对应的代码详见Github: openMMLabCampusLearn/selfExercise/2.图像EXIF信息.ipynb
3.1 图像的EXIF
3.1.1 基本介绍
可交换图像文件格式(英语:Exchangeable image file format,官方简称Exif),是专门为数码相机的照片设定的,可以记录数码照片的属性信息和拍摄数据。
- Exif可以附加于JPEG、TIFF、RIFF等文件之中,为其增加有关数码相机拍摄信息的内容和索引图或图像处理软件的版本信息。
- Windows 7操作系统具备对Exif的原生支持,通过鼠标右键点击图片打开菜单,点击属性并切换到详细信息标签下即可直接查看Exif信息。
- macOS也可以看,双击图像,在预览中->点击检查器->点击i符号,就可以看到了

- Exif信息是可以被任意编辑的,因此只有参考的功能。Exif信息以0xFFE1作为开头标记,后两个字节表示Exif信息的长度。所以Exif信息最大为64 kb,而内部采用TIFF格式。
关于EXIF中tags的介绍,可以看EXIF标准的pdf文件:https://www.cipa.jp/std/documents/e/DC-X008-Translation-2019-E.pdf

可以把一个jpeg图像后缀名改为txt格式,用文本文件打开,就可以看到读取JPG图片的Exif属性(一) - Exif信息简介里介绍的那些十六进制码流了
参考:
- 百度百科-Exif
- wiki百科-https://en.wikipedia.org/wiki/Exif
- 这里提供了EXIF标准的pdf文件链接:https://www.cipa.jp/std/documents/e/DC-X008-Translation-2019-E.pdf
- 进而可以知道JPEG中EXIF信息的规定,要去看JPEG的标准:ISO/IEC 10918-1
- 读取JPG图片的Exif属性(一) - Exif信息简介
3.1.2 JEPG等格式说明
关于JEPG解码的格式,主要要去看这个协议:
ISO/IEC 10918-1(ISO/IEC 10918-1:1994
Information technology — Digital compression and coding of continuous-tone still images: Requirements and guidelines)
参考:
- 读取JPG图片的Exif属性(一) - Exif信息简介
- 这里涉及到一些JEPG格式中EXIF的内容
- JPEG文件编/解码详解
- JPEG文件格式及其解码流程
3.1.3 EXIF属性和对应code
from PIL import Imagedemo_path = "datasets/cat_dataset/images/IMG_20211020_091507.jpg"
demo_image = Image.open(demo_path)for k, v in demo_image.getexif().items():print("Tag", k, "Value", v)
> Tag 274 Value 6
这里的274表示的是图像的朝向(Orientation),
参考:
- 【记录】PIL img.getexif()获取图像信息
- https://pillow.readthedocs.io/en/stable/reference/Image.html#PIL.Image.Exif
3.1.4 EXIF中的key和value意义(EXIF Tags)
| Tag (hex) | Tag (dec) | IFD | Key | Type | Tag description |
|---|---|---|---|---|---|
| 0x000b | 11 | Image | Exif.Image.ProcessingSoftware | Ascii | The name and version of the software used to post-process the picture |
| 0x0100 | 256 | Image | Exif.Image.ImageWidth | Long | The number of columns of image data, equal to the number of pixels per row. In JPEG compressed data a JPEG marker is used instead of this tag. |
| 0x0101 | 257 | Image | Exif.Image.ImageLength | Long | The number of rows of image data. In JPEG compressed data a JPEG marker is used instead of this tag. |
| 0x0103 | 259 | Image | Exif.Image.Compression | Short | The compression scheme used for the image data. When a primary image is JPEG compressed, this designation is not necessary and is omitted. When thumbnails use JPEG compression, this tag value is set to 6. |
| 0x0106 | 262 | Image | Exif.Image.PhotometricInterpretation | Short | The pixel composition. In JPEG compressed data a JPEG marker is used instead of this tag. |
| 0x0107 | 263 | Image | Exif.Image.Thresholding | Short | For black and white TIFF files that represent shades of gray, the technique used to convert from gray to black and white pixels. |
| 0x0108 | 264 | Image | Exif.Image.CellWidth | Short | The width of the dithering or halftoning matrix used to create a dithered or halftoned bilevel file. |
| 0x010a | 266 | Image | Exif.Image.FillOrder | Short | The logical order of bits within a byte |
| 0x010f | 271 | Image | Exif.Image.Make | Ascii | The manufacturer of the recording equipment. This is the manufacturer of the DSC, scanner, video digitizer or other equipment that generated the image. When the field is left blank, it is treated as unknown. |
| 0x0110 | 272 | Image | Exif.Image.Model | Ascii | The model name or model number of the equipment. This is the model name or number of the DSC, scanner, video digitizer or other equipment that generated the image. When the field is left blank, it is treated as unknown. |
| 0x0112 | 274 | Image | Exif.Image.Orientation | Short | The image orientation viewed in terms of rows and columns |
| 0x011a | 282 | Image | Exif.Image.XResolution | Rational | The number of pixels per in the direction. When the image resolution is unknown, 72 [dpi] is designated. |
| 0x011b | 283 | Image | Exif.Image.YResolution | Rational | The number of pixels per in the direction. The same value as is designated. |
上面只贴了一部分,完整的可以参考:
- Standard Exif Tags
- TIFF Tag Reference, Exif Tags
- 在线表格转markdown语法可以使用:https://jakebathman.github.io/Markdown-Table-Generator/
另外,有些字段的取值是枚举的,每个值都有自己的意义,以Exif.Image.Orientation为例,在参考网站中搜索Orientation字段,可以得到:
1 = Horizontal (normal)
2 = Mirror horizontal
3 = Rotate 180
4 = Mirror vertical
5 = Mirror horizontal and rotate 270 CW(ClockWise rotation,顺时针方向)
6 = Rotate 90 CW
7 = Mirror horizontal and rotate 90 CW
8 = Rotate 270 CW
具体字段的值可以看看:
- https://exiftool.org/TagNames/EXIF.html
- https://www.media.mit.edu/pia/Research/deepview/exif.html
- 不嫌麻烦的也可以在原始标准文档中看:https://www.cipa.jp/std/documents/e/DC-X008-Translation-2019-E.pdf
3.1.5 借助EXIF信息处理图像的意义
以下内容转载自:
- ✅计算机视觉模型效果不佳,你可能是被相机的Exif信息坑了 来源:量子位
- ✅知乎-计算机视觉应用开发中踩到EXIF的坑
日常用手机拍照的时候应该都遇到过这种情况:竖着拿手机拍横向的内容时,手机里的画面会自动变成横向,拍摄结束后,也会以横向的格式保存。
- 以手机为例: iOS的设备中也是包含了这样的方向传感器,它也采用了同样的方式来保存照片的方向信息到EXIF中。但是它默认的照片方向并不是竖着拿手机时的情况,而是横向,即Home键在右侧,如下:

- 如此一来,如果竖着拿手机拍摄时,就相当于对手机顺时针旋转了90度,也即上面相机图片中的最后一幅,那么它的Orientation值为6。即,默认存储图像格式是横屏的,显示时会加上EXIF的信息。(软件中看到的图是进行了EXIF信息变换之后的)

- EXIF原先是用在TIFF图像格式上,后来才加入到JPEG图像格式中,而图像数据集中的图片大多是JPEG格式。大多数训练图像中则不含EXIF信息(PNG图像无法保存EXIF信息)。
- 一些程序为了保持向后兼容性,不会去解析EXIF信息。大多数用于处理图像数据的Python库(如NumPy、SciPy,TensorFlow,Keras等)就是这样的。
- 这意味着当你使用这些工具导入图像时,都将获得原始的未旋转图像数据。
- 如果把这些侧躺着或上下颠倒的图像输入到CV模型中,会得到错误的检测结果;
- 如在我现在描述的场景中,图像就旋转了270度,导致图像的宽高颠倒了。
- 电脑软件和手机可以正确显示图像方向,是因为其会对EXIF进行解析和处理
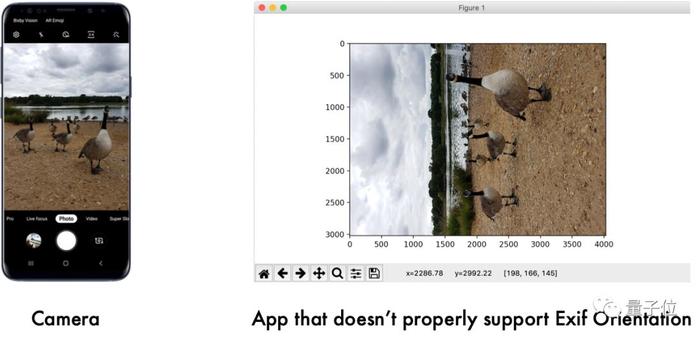
- 所以同一张图,手机可以正常显示,而使用matplotlib这些进行显示则长宽就可能错位。
3.2 使用PIL借助EXIF校正图像旋转
3.2.0 PIL支持的EXIF Tags
from PIL import ExifTags
for k,v in ExifTags.TAGS.items():print(f"Tag:{k}, Value:{v}")
>...
Tag:271, Value:Make
Tag:272, Value:Model
Tag:273, Value:StripOffsets
Tag:274, Value:Orientation
...
参考:
- Get date and time when photo was taken from EXIF data using PIL
- https://pillow.readthedocs.io/en/stable/reference/ExifTags.html
3.2.1 推荐简单的写法
在Pillow>=6.0.0的版本里,已经有一个现成的工具帮助用户根据EXIF的Orientation信息旋转图像
from PIL import ImageOps
image = ImageOps.exif_transpose(image)
"""
ImageOps.exif_transpose:
如果一个图像的EXIF朝向标签的值不是1,根据其方向值对图像进行转换,然后删除方向标签
"""# 完整代码
from PIL import ImageOps,Image
demo_path = "datasets/cat_dataset/images/IMG_20211020_091507.jpg"
demo_image = Image.open(demo_path)image = ImageOps.exif_transpose(demo_image)plt.figure(figsize=(8,6))
plt.subplot(1,2,1)
plt.title(f"Orientation:{demo_image.getexif()[274]}")
plt.imshow(demo_image)
plt.axis("off")plt.subplot(1,2,2)
plt.title("Modified")
plt.imshow(image)
plt.axis("off")

- 对于numpy、matplotlib等库来说,默认不使用EXIF信息,所以呈现的就是左侧的样子。
- 但是对于标注数据来说,标注软件会读取EXIF信息,所以在标注软件中显示的是右侧的图像,则标注信息对应的也是右边。
- 所以如果不对原图进行旋转,重新保存的话,在大部分的python程序里,读入都是不对的。
- 另外,还有一点:
- ImageOps.exif_transpose在完成数据转换后,会删除方向标签
- 防止转换后的图像还有方向标签,后续处理程序不断进行旋转。
- 以及防止再次标注时,标注软件等解析EXIF,导致显示错误
参考:
- Rotating an image with orientation specified in EXIF using Python without PIL including the thumbnail
- https://pillow.readthedocs.io/en/latest/_modules/PIL/ImageOps.html#exif_transpose
3.2.2 朴实的写法
老式的写法(MMDetection课上写的,其实是来自PIL提供的exif_transpose函数的改写,点击这里)
下面的脚本,在旋转图像后,并没有删除方向标签,可能会给之后的重新标记或者其他处理带来隐患。。
def apply_exif_orientation(image):_EXIF_ORIENT =274if not hasattr(image,'getexif'):return imagetry:exif = image.getexif()except Exception:exif=Nonereturn imageorientation = exif.get(_EXIF_ORIENT)"""1 = Horizontal (normal)2 = Mirror horizontal # 水平镜像3 = Rotate 180 # 旋转180度4 = Mirror vertical # 竖直镜像5 = Mirror horizontal and rotate 270 CW(ClockWise rotation,顺时针方向)6 = Rotate 90 CW # orientation=6 表示这张图在标注软件上显示是 顺时针旋转原图90度之后的样子7 = Mirror horizontal and rotate 90 CW8 = Rotate 270 CW"""method = {2:Image.FLIP_LEFT_RIGHT,3:Image.ROTATE_180,4:Image.FLIP_TOP_BOTTOM,5:Image.TRANSPOSE,6:Image.ROTATE_270, # PIL库旋转都是以逆时针方向角度来算的,所以这里和上面90度是互补的7:Image.TRANSVERSE,8:Image.ROTATE_90}.get(orientation)if method is not None:return image.transpose(method)# 注意,旋转的时候是以左上角的顶点为旋转中心进行旋转的return image
根据:Image.rotate(angle, resample=Resampling.NEAREST, expand=0, center=None, translate=None, fillcolor=None)可知:
- Image这个库旋转使用的是逆时针的角度。。。
- angle – In degrees counter clockwise.
参考:
- Image.rotate(angle, resample=Resampling.NEAREST, expand=0, center=None, translate=None, fillcolor=None)
- image_to_numpy/image_to_numpy/src.py
- Python: PIL读取的图像发生自动旋转
- PIL Image 旋转 Rotate函数的坑和解决方案
3.3 OpenCV中的EXIF信息问题
3.3.1 imread默认应用了EXIF
默认OpenCV在读取图像时已经应用了EXIF信息
import cv2
demo_path = "datasets/cat_dataset/images/IMG_20211020_091507.jpg"demo_image = cv2.imread(demo_path)
plt.imshow(demo_image[:,:,::-1])

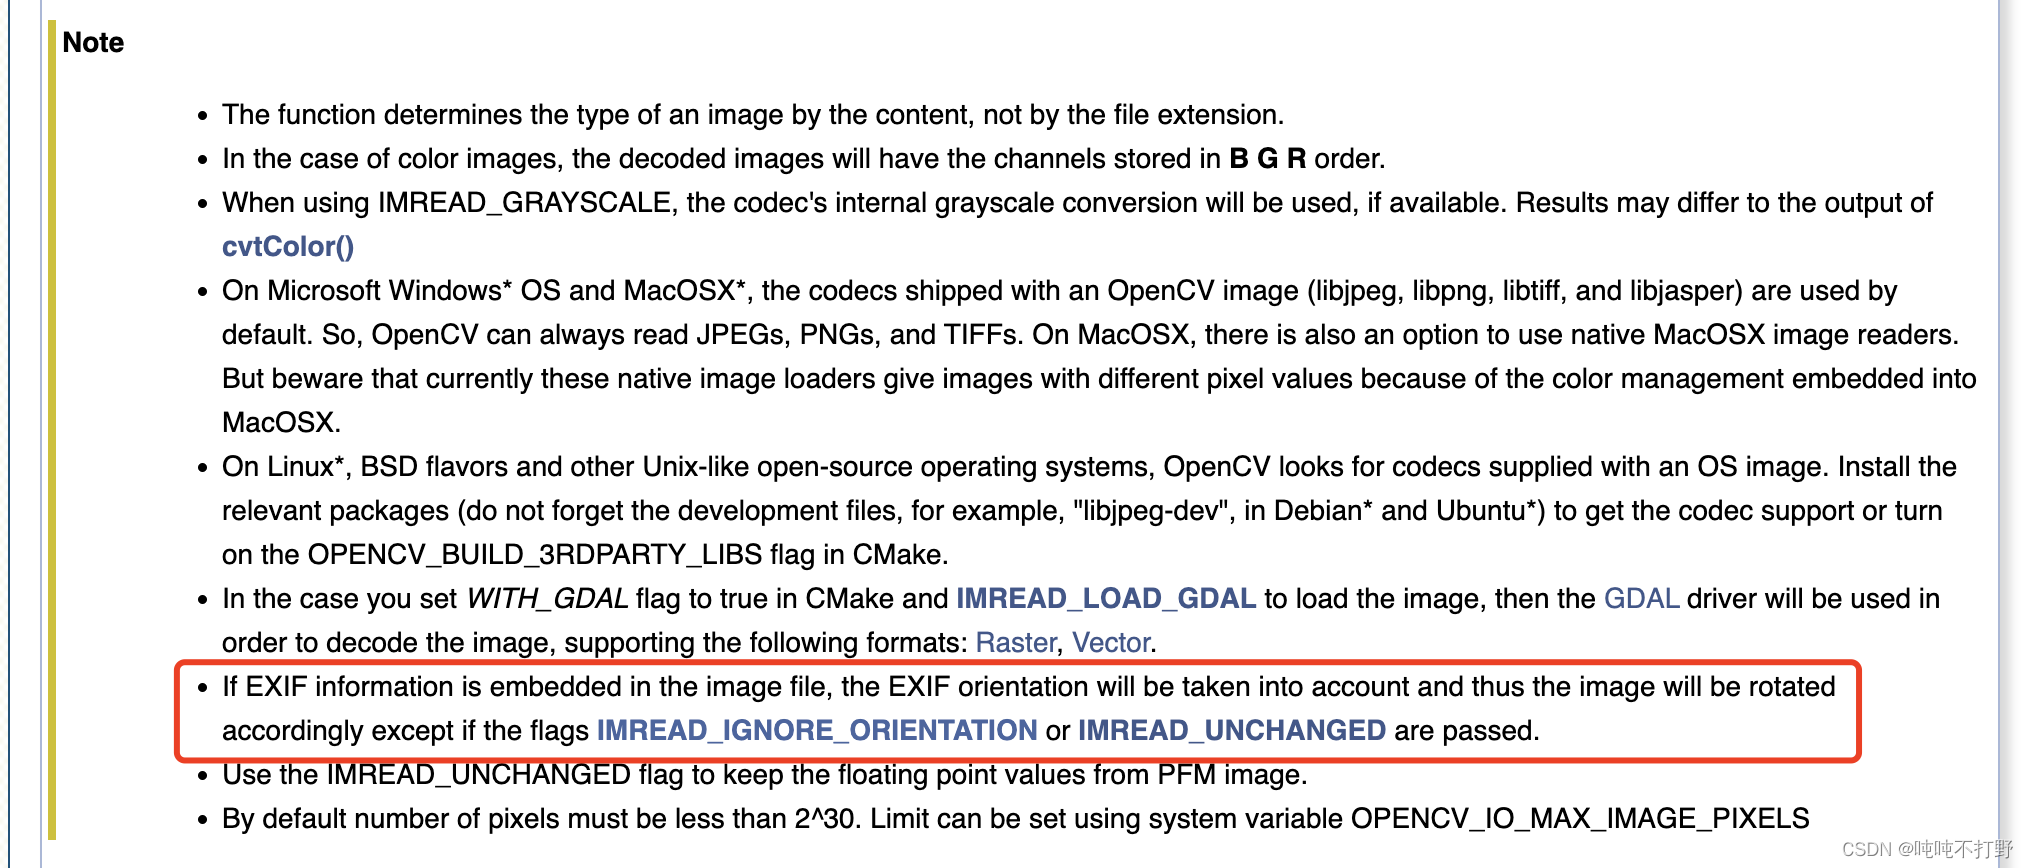
详见:Opencv4.x-imread()-文档
或者看看这个讲解:20170227. EXIF信息的说明(opencv320 ApplyExifOrientation)
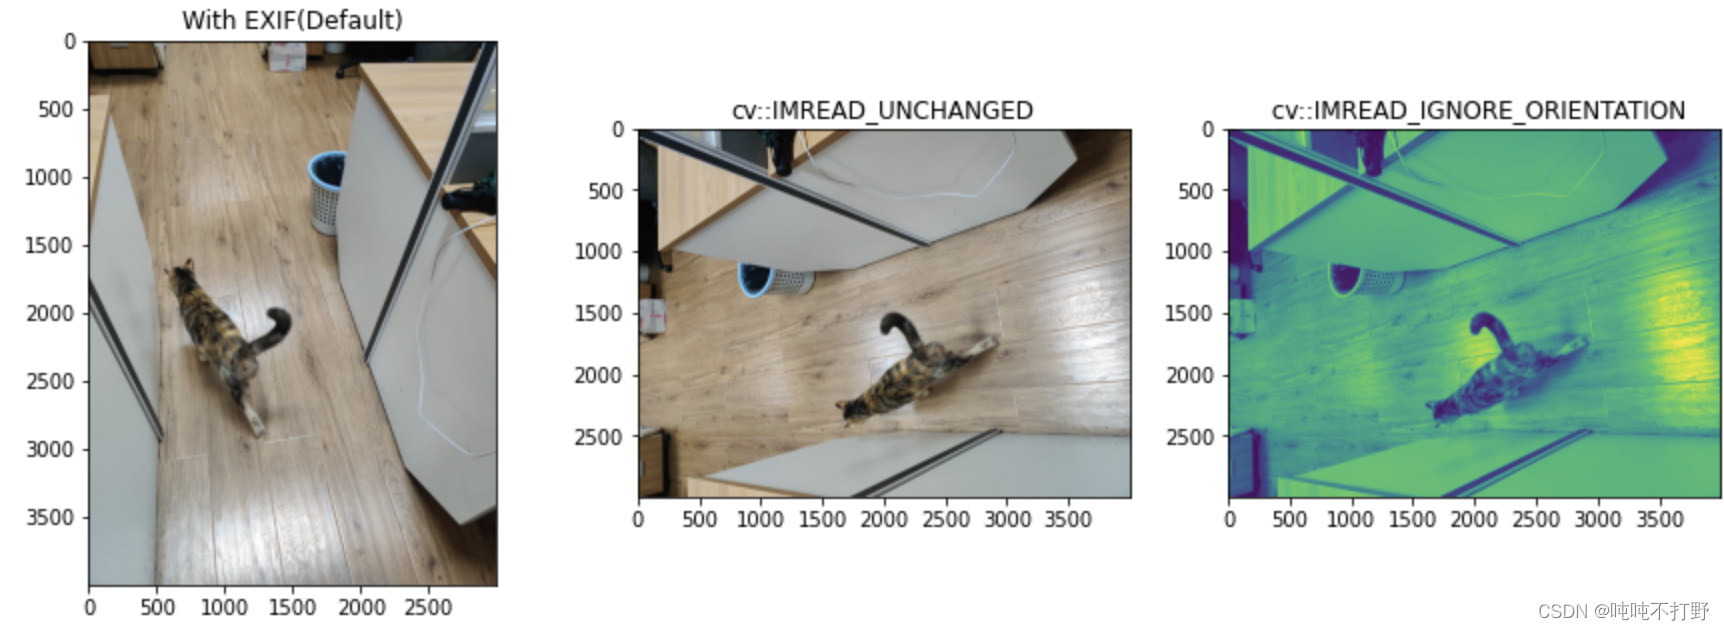
3.3.2 imread默认不应用EXIF
如果不想OpenCV默认使用EXIF信息,可以:
import cv2
demo_path = "datasets/cat_dataset/images/IMG_20211020_091507.jpg"plt.figure(figsize=(15,5))
plt.subplot(1,3,1)
demo_image = cv2.imread(demo_path)
plt.title("With EXIF(Default)")
plt.imshow(demo_image[:,:,::-1])plt.subplot(1,3,2)
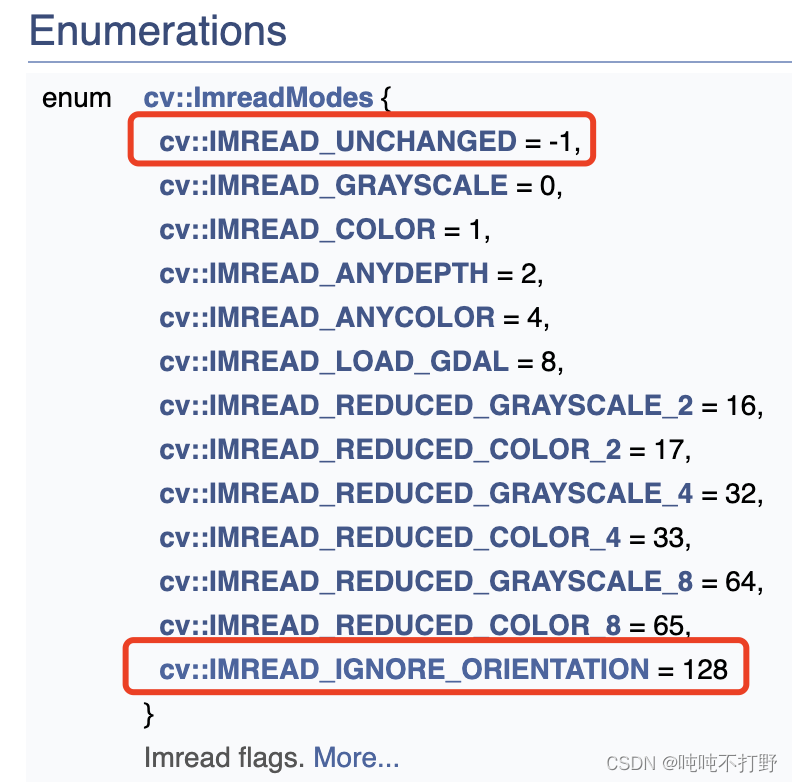
# opencv-python要求Flag必须是整数,所以要找Flag对应的整数值
withOut_image_1 = cv2.imread(demo_path,-1)
plt.title("cv::IMREAD_UNCHANGED")
# cv::IMREAD_UNCHANGED 会保持原图的通道数
plt.imshow(withOut_image_1[:,:,::-1])plt.subplot(1,3,3)
withOut_image_2 = cv2.imread(demo_path,128)
plt.title(" cv::IMREAD_IGNORE_ORIENTATION")
# cv::IMREAD_IGNORE_ORIENTATION输出单通道图像
plt.imshow(withOut_image_2)
参考:
- https://docs.opencv.org/4.x/d8/d6a/group__imgcodecs__flags.html#ga61d9b0126a3e57d9277ac48327799c80
- https://docs.opencv.org/4.x/d8/d6a/group__imgcodecs__flags.html#gga61d9b0126a3e57d9277ac48327799c80a34f91a514cd95127d8ba900840af548e
本文链接:https://my.lmcjl.com/post/6034.html
4 评论