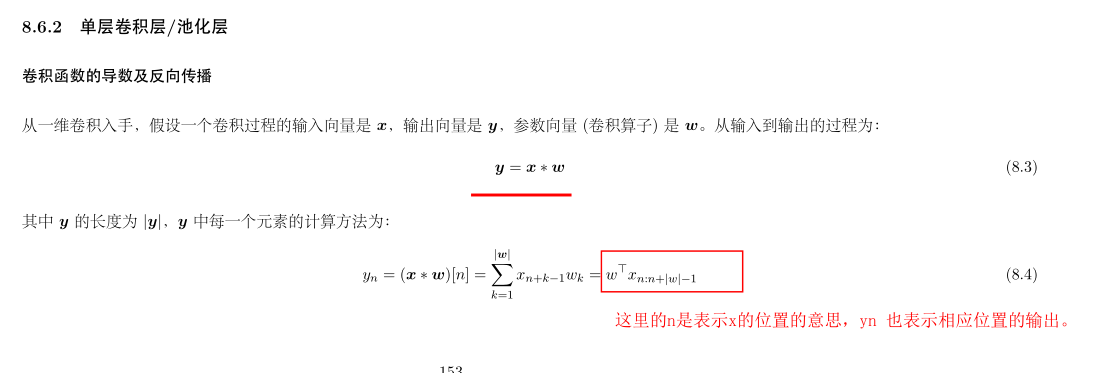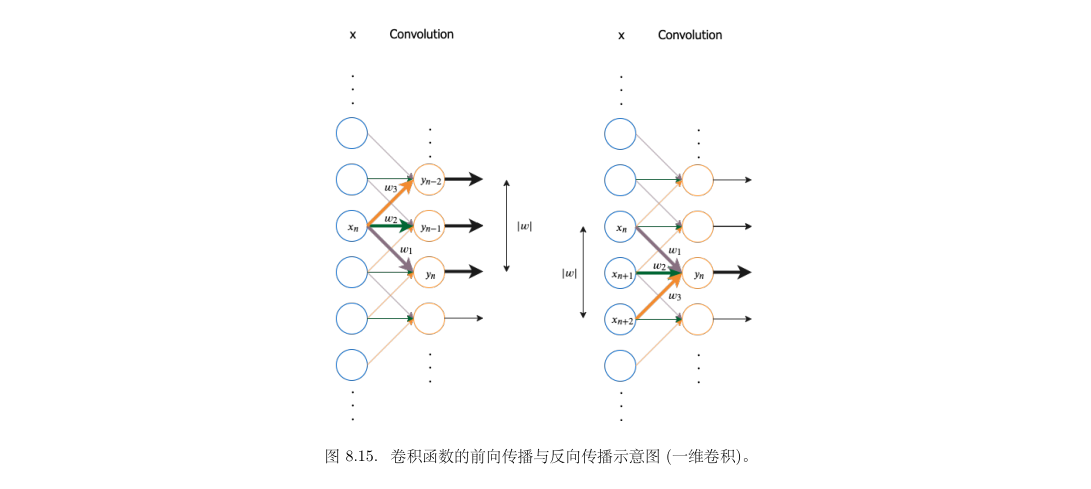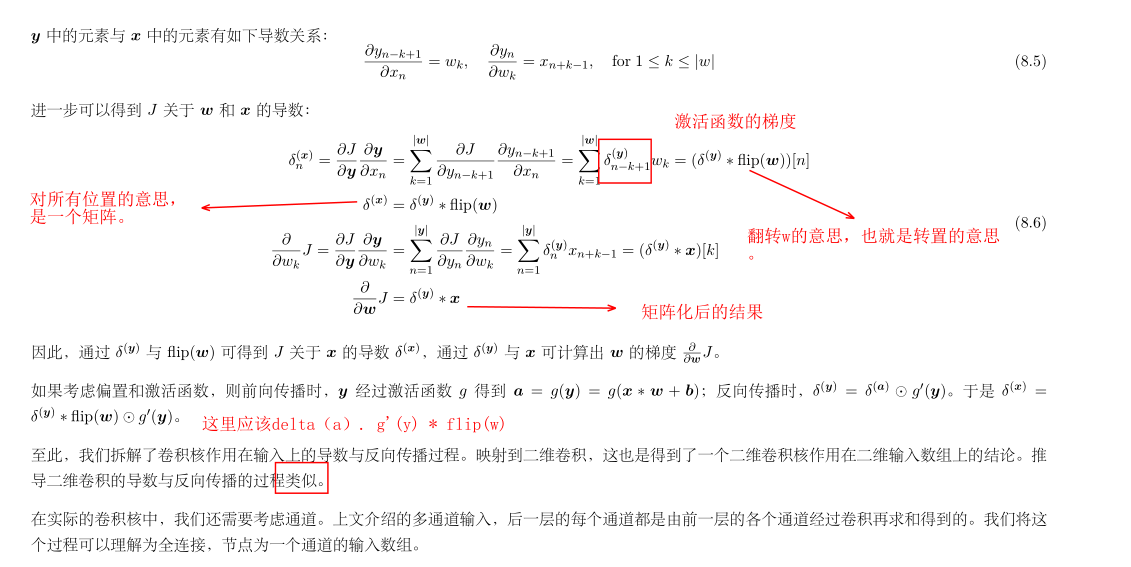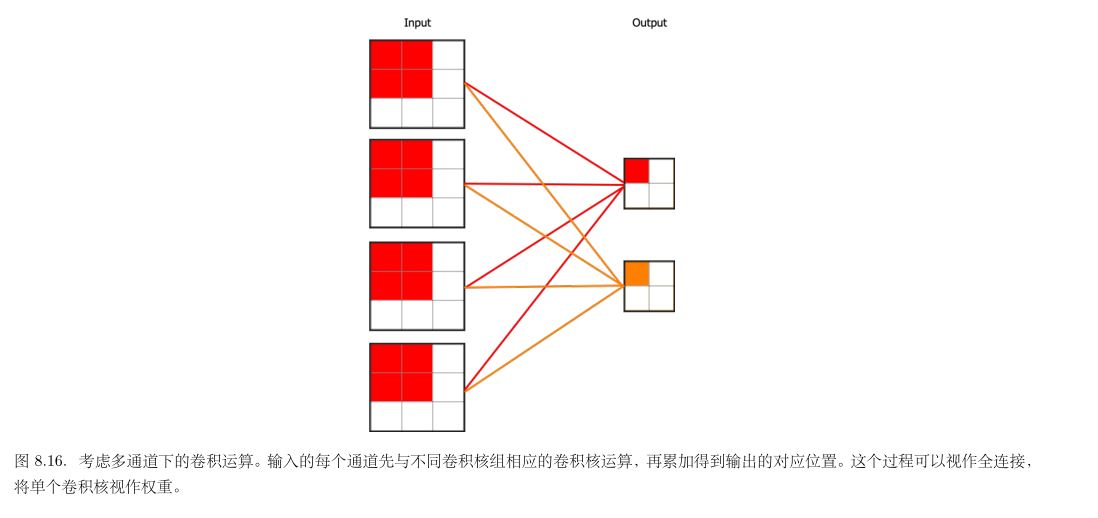


用for循环实现的卷积层:
卷积运算:
import time
""" 定义2维度卷积的非矩阵操作"""
def Conv2d(X,W, stride, pad, dilation=1):"""参数说明::param X: 输入,batchsize, in_rows, in_cols, in_channels.:param W: 权重,shape: kernel_row, kernel_col, in_channels, out_channels.:param stride::param pad: 填充,元组,或者 same,vilad:param dilation: 扩张率。:return: 卷积的结果,shape: batchsize, out_rows, out_cols, outchannels"""s, d = stride, dilationX_pad, p = Pad2D(X, pad, W.shape[:2], stride=s, dilation=dilation)pr1, pr2, pc1, pc2 = pprint(p)x_samples, x_rows, x_cols, in_channels = X.shapefr,fc,in_channels,out_channels = W.shape# 先计算输出的形状:# 扩张情况下_fr, _fc = fr + (fr-1)*(d-1), fc + (fc-1)*(d-1)out_rows, out_cols = int((x_rows + pr1 + pr2 - _fr + s)/s) , int((x_cols + pc1 + pc2 +s - _fc)/s)# 然后构造输出矩阵,默认0填充,并计算各个位置的值。Z = np.zeros(shape=(x_samples, out_rows, out_cols, out_channels))# print(Z.shape)start_time = time.time()for m in range(x_samples):for c in range(out_channels):for i in range(out_rows):for j in range(out_cols):# 以i,j 像素为中心进行卷积乘法。i0, i1 = i*s, i*s + _fr  # 当前位置加上卷积核的大小。一样大或者较小。j0, j1 = j*s, j*s + _fc# 从xpad 中切片窗口。window = X_pad[m, i0:i1:d, j0:j1:d, :] # 第m个样本: 所有输入通道,shape : k,k,inchannel.Z[m,i,j,c] =np.sum( window * W[:,:,:,c])   # w[:,:,:,c] shape : k,k,inchanel.# 各个通道的和,并且是个标量。t = time.time() - start_timeprint(f"compute timing used {t}")return Z
卷积层:
""" 反向传播"""
from utils import LayerBase,WeightInitializer,ActivationInitializer
from init_method import glorot_uniform# 正式建立卷积层,上边的只是运算,下边将建立卷积层,需要有正向传播,反向传播,参数,梯度列表等。
class Conv2D(LayerBase):def __init__(self,out_ch,kernel_shape,pad=0,stride=1,dilation=1,acti_fn=None,optimizer=None,init_w = "glorot_uniform",):"""二维卷积实现:param out_ch: 输出通道,也就是卷积核的数目,int:param kernel_shape: 卷积核的形状,(int,int):param pad: 扩展,tuple 或者 same 或者valid:param stride::param dilation:膨胀系数:param acti_fn: 激活函数:param optimizer::param init_w:"""super().__init__(optimizer)self.pad = padself.stride = strideself.dilation = dilationself.acti_fn = acti_fnself.kernel_shape = kernel_shapeself.out_ch = out_chself.in_ch = Noneself.init_w = init_wself.init_weight = WeightInitializer(mode=init_w)self.acti_fn = ActivationInitializer(acti_name=acti_fn)()self.parameters = {"W": None, "b":None}self.is_initialized = Falsedef _init_params(self):""" 对参数进行各种优化"""fr,fc = self.kernel_shape # 卷积核W = self.init_weight((fr, fc, self.in_ch, self.out_ch))b = np.zeros((1,1,1,self.out_ch)) # output shape : nsampels, h,w, outchannels.self.params = {"W":W, "b":b}self.gradients = {"W":np.zeros_like(W), "b": np.zeros_like(b)}self.derived_variables = {"Y": []}  # 用来记录未被激活的函数。self.is_initialized = Truedef forward(self,X, retain_derived=True):"""正向传播:param X: parameters:return:"""if not self.is_initialized :self.in_ch = X.shape[3] # bz, h, w, cself._init_params()W = self.params["W"]b = self.params["b"]n_samp, in_rows, in_cols, in_ch = X.shapes, p , d = self.stride, self.pad, self.dilationY = Conv2d(X, W, s, p, d) + b# active Y to a:a = self.acti_fn(Y)if retain_derived:self.X.append(X)   # X 是list形式保存的。self.derived_variables["Y"].append(Y)return  a #结果是经过激活过的。def backward(self, dLda, retain_grads=True):  # dLda 是对激活后的a的梯度,而dLdY 则为dlda * dady , dady = acti_fn.grad(Y)"""反向传播:param dLda: 后边一层或者结果的梯度。:param retain_grads: 是否保存梯度:return: dXs : 当前卷积对于输入对关于算是的梯度,shape: (n_samples, in_rows, in_cols, in_ch)"""if not isinstance(dLda, list):dLda = [dLda] #list,因为X也是以list进行保存的。W = self.params["W"]b = self.params["b"]Ys = self.derived_variables["Y"]Xs , d = self.X, self.dilation(fr, fc), s, p = self.kernel_shape, self.stride, self.paddXs = []for X,Y, da in zip(Xs, Ys, dLda):  # 这里这样如果每个batch都进行反向传播,其实x,y,da 就是 xs, ys, dlda# 但是如果因为显存问题,而设置成每两个或者多个batch进行反向传播一次的话,那么此时的XYda 存储的将是# 多个 batch 的列表,所以需要这样进行一个for循环。n_samp, out_rows, out_cols, out_ch = da.shape# n_samp : 就是batchsizeX_pad, (pr1, pr2, pc1, pc2) = Pad2D(X, p, self.kernel_shape,s,d)dY = da * self.acti_fn.grad(Y) # 这里的Y经过激活的,所以中间需要计算额外的dX = np.zeros_like(X_pad)dW , db = np.zeros_like(W), np.zeros_like(b)for m in range(n_samp):for i in range(out_rows):for j in range(out_cols):for c in range(out_ch):  #单个算术单个算术的计算。i0, i1 = i*s, (i*s) + fr + (fr-1)*(d-1) # DX 的坐标。j0, j1 = j*s, (j*s) + fc + (fc-1)*(d-1)wc = W[:,:,:,c]kernel = dY[m,i,j,c]window = X_pad[m, i0:i1:d, j0:j1:d, :]db[:,:,:,c] += kerneldW[:,:,:,c] += window*kernel   # Z[m,i,j,c] =np.sum( window * W[:,:,:,c])dX[m, i0:i1:d, j0:j1:d, :]  += (wc* kernel) # dX 的梯度会由多个y贡献。if retain_grads :self.gradients["W"] += dWself.gradients["b"] += dbpr2 = None if pr2==0 else -pr2pc2 = None if pc2==0 else -pc2dXs.append(dX[:, pr1:pr2, pc1:pc2, :])  # 去掉pad 0 值。return dXs[0] if len(Xs)==1 else dXs@propertydef hyperparams(self):return {"layer": "Conv2D","pad": self.pad,"init_w": self.init_w,"in_ch": self.in_ch,"out_ch": self.out_ch,"stride": self.stride,"dilation": self.dilation,"acti_fn": str(self.acti_fn),"kernel_shape": self.kernel_shape,"optimizer": {"cache": self.optimizer.cache,"hyperparams": self.optimizer.hyperparams,},
}
用矩阵实现的卷积运算和卷积层
将img 转化成条状,详细见 链接
import numpy as np
from different_convolution import Pad2D
def _im2col_indices(x_shape, fr, fc, p, s, d=1):""" 计算各个索引"""pr1, pr2, pc1, pc2 = pn_ex, n_in, in_rows, in_cols = x_shape_fr, _fc = fr + (fr - 1) * (d - 1), fc + (fc - 1) * (d - 1)out_rows = int((in_rows + pr1 + pr2 - _fr + s) / s)out_cols = int((in_cols + pc1 + pc2 - _fc + s) / s)print(out_rows,out_cols)# 28 28i0 = np.repeat(np.arange(fr), fc)  # 000111222   * n_in.# 000111222i0 = np.tile(i0, n_in) * di1 = s * np.repeat(np.arange(out_rows), out_cols)  # 00000..0 11111..1 2222..2.# 这里i1 的个数其实就是输出的图像的尺度的长宽大小。# 对于每一个位置,都需要相应的卷积得到结果。j0 = np.tile(np.arange(fc), fr * n_in)  # 相当与相对索引。j1 = s * np.tile(np.arange(out_cols), out_rows) # 相当于绝对索引。 i1 j1 确定位置, i0,j0 确定卷积。得到切块。i = i0.reshape(-1, 1) + i1.reshape(1, -1)# 第二个的索引。j = j0.reshape(-1, 1) + j1.reshape(1, -1)# 第三个索引。k = np.repeat(np.arange(n_in), fr * fc).reshape(-1, 1)return k, i, j# k,i,j = _im2col_indices((10, 3, 28,28), 3,3, (1,1,1,1), s=1, d=1)
# print(k.shape)  # 27 1  #通道维度保证了 三维坐标。
# [
#  [0]
#  [0]
#  [0]
#  [1]
#  [1]
#  [1]
#  [2]
#  [2]
#  [2]
#  ]# print(i.shape)  # 27 784
# [[ 0  0  0 ... 27 27 27]   # 自上而下的对应。 一共啊27 行,也就是27个卷积块。27 : k*k*n_in, 784: out*out
# #  [ 0  0  0 ... 27 27 27]
# #  [ 0  0  0 ... 27 27 27]
# #  ...
# #  [ 2  2  2 ... 29 29 29]
# #  [ 2  2  2 ... 29 29 29]
# #  [ 2  2  2 ... 29 29 29]]# print(j.shape)  # 27 784# [[ 0  1  2 ... 25 26 27]
#  [ 1  2  3 ... 26 27 28]
#  [ 2  3  4 ... 27 28 29]
#  ...
#  [ 0  1  2 ... 25 26 27]
#  [ 1  2  3 ... 26 27 28]
#  [ 2  3  4 ... 27 28 29]]
def im2col(X, W_shape, pad, stride, dilation=1):fr, fc, n_in, n_out = W_shapes, p, d = stride, pad, dilationn_samp, in_rows, in_cols, n_in = X.shapeX_pad, p = Pad2D(X, p, W_shape[:2], stride=s, dilation=d)pr1, pr2, pc1, pc2 = p# 将输入的通道维数移至第二位X_pad = X_pad.transpose(0, 3, 1, 2)k, i, j = _im2col_indices((n_samp, n_in, in_rows, in_cols), fr, fc, p, s, d)# X_col.shape = (n_samples, kernel_rows*kernel_cols*n_in, out_rows*out_cols)X_col = X_pad[:, k, i, j]X_col = X_col.transpose(1, 2, 0).reshape(fr * fc * n_in, -1)return X_col, p
将col_img 转换回img形式(4d)
""" 矩阵方法实现的卷积层"""
def col2im(X_col, X_shape, W_shape, pad, stride, dilation=0):"""功能::将2d 图像变化为4d 图像。:param X_col::param X_shape: 原始输入形状: bs, in_rows, in_cols, in_ch:param W_shape: krenel_rows, kernel_cols, in_ch, out_ch:param pad: 4-tuple:param stride: int 型:param dilation: 扩张率 default =1:return image : nsamples, in_rows, in_cols, in_ch"""s, d = stride, dilationpr1, pr2, pc1, pc2 = padfr, fc, n_in, n_out = W_shapen_samp, in_rows, in_cols, n_in = X_shapeX_pad = np.zeros((n_samp, n_in, in_rows + pr1+pr2, in_cols+ pc1+pc2)) # 输出的图像,现在要做的就是将X_col 转换成X_pad 的形式。k,i,j = _im2col_indices(x_shape =(n_samp, n_in, in_rows, in_cols), fr=fr, fc=fc, p=pad, s=s, d=d)# 得到了相应索引,要做的就是通过这个索引来将col格式的图像转化回img格式的图像。# X_col.shape = (n_samples, kernel_rows * kernel_cols * n_in, out_rows * out_cols)X_col_reshaped = X_col.reshape(n_in*fr*fc, -1, n_samp) # shape: (nin*k*k, out_r*out_col, n_samp).X_col_reshaped = X_col_reshaped.transpose(2,0,1)  # shape : (n_samp, nin*k*k, out_r*out_col)# 之前是从xpad的索引kij得到xcol_reshaped , 现在是要反向操作从 x_col_reshaped 得到xpadnp.add.at(X_pad, (slice(None), k, i,j), X_col_reshaped) # ???# slice 的作用就是等价与: 所以中间: (slice(none), k, i, j) ---> (:,k,i,j )# at 函数的作用:a[indices] += b`# np.add.at 是np.unfunc.at(a, idc, b) 的一种应用,但是如果idc重复的索引会计算多次,但是# 本稳重的 slice (k,i,j) 对应的索引都是不重复的,所以并不会被计算多次????# b = np.asarray([[1, 2, 3, 4, 5, 6]])# bexp = b[:,[[2,3,4],[3,4,5]]]   ------ 3 4 是重复的位置。# bexp# Out[56]:# array([[[3, 4, 5],#         [4, 5, 6]]])# c = np.zeros_like(b)# c# Out[58]: array([[0, 0, 0, 0, 0, 0]])# np.add.at(c, (slice(None),[[2,3,4],[3,4,5]] ), bexp)# c# Out[60]: array([[ 0,  0,  3,  8, 10,  6]])# b# Out[61]: array([[1, 2, 3, 4, 5, 6]])# c[(slice(None),[[2,3,4],[3,4,5]] )] += bexp# b# Out[63]: array([[1, 2, 3, 4, 5, 6]])# c# Out[64]: array([[ 0,  0,  6, 12, 15, 12]])# d = np.zeros_like(c)# d[(slice(None),[[2,3,4],[3,4,5]] )] += bexp# d# Out[67]: array([[0, 0, 3, 4, 5, 6]])pr2 = None if pr2==0 else pr2 = -pr2pc2 = None if pc2==0 else pc2 = -pc2# 定义尾部 切去两边,得到原图像。但是这里有个问题是: np.add.at() 会将重复的进行多次相加。xpad 在取索引的时候就是被# 多次取重复的元素,那么有的元素就会多次相加。# 修正:X_pad[(slice(None), k,i,j)] += X_col_reshaped# 这样的xpad 才是原始的xpadpr2 = None if pr2 == 0 else pr2 = -pr2pc2 = None if pc2 == 0 else pc2 = -pc2return X_pad[:,:,pr1:pr2, pc1:pc2]
卷积运算:
def conv2D_gemm(X,W, stride=0, pad="same", dilation=1):s, d = stride, dilation_, p = Pad2D(X, pad, W.shape[:2], s, dilation=dilation)pr1, pr2, pc1, pc2 = pfr, fc, in_ch, out_ch = W.shapen_samp, in_rows, in_cols, in_ch = X.shape# 考虑扩张率_fr, _fc = fr + (fr - 1) * (d - 1), fc + (fc - 1) * (d - 1)# 输出维数,根据上面公式可得out_rows = int((in_rows + pr1 + pr2 - _fr) / s + 1)out_cols = int((in_cols + pc1 + pc2 - _fc) / s + 1)# 将 X 和 W 转化为 2D 矩阵并乘积X_col, _ = im2col(X, W.shape, p, s, d)W_col = W.transpose(3, 2, 0, 1).reshape(out_ch, -1)Z = (W_col @ X_col).reshape(out_ch, out_rows, out_cols, n_samp).transpose(3, 1, 2, 0)return Z
# test the conv2d :
"""x = np.random.random(size=(10,32,32,3)) # 3 通道的,batchsize 10, 大小为 32 32
w = np.random.random(size=(3,3,3,64)) # 输入为3通道,输出为64通道,kernel 3 3# print(x.shape)
# print(w.shape)
import time
start = time.time()
conv_result = conv2D_gemm(x,w, stride=2, pad="same", dilation=1)
print(f"using time  : {time.time()-start}")
print(conv_result.shape)
"""
卷积层:
""" 定义卷积层,矩阵实现"""
class Conv2D_gemm(LayerBase):""" 卷积的矩阵实现,重点是怎么进行反向传播的定义"""def __init__(self,out_ch,kernel_shape,pad=0,stride=1,dilation=1,acti_fn=None,optimizer=None,init_w = "glorot_uniform",):"""参数说明::param out_ch: 输出通道:param kernel_shape: 单个卷积核的形状。:param pad: 扩展。:param stride: 卷积核的卷积幅度,int型号。:param dilation: 扩展率。:param acti_fn: 激活函数。:param optimizer::param init_w:"""super().__init__(optimizer)self.out_ch = out_chself.in_ch = Noneself.pad = padself.kernel_shape = kernel_shapeself.stride = strideself.dilation = dilationself.optimizer = optimizerself.init_w = init_wself.init_weights = WeightInitializer(mode=init_w)self.acti_fn = ActivationInitializer(acti_fn)()self.params = {"W":None, "b":None}self.is_initialized = Falsedef _init_params(self):fr, fc = self.kernel_shapeW = self.init_weights((fr,fc, self.in_ch, self.out_ch))b = np.zeros((1,1,1, self.out_ch))self.params = {"W":np.zeros_like(W), "b":np.zeros_like(b)}self.derived_variables = {"Y":[]}self.is_initialized = Truedef forward(self,X,retain_derived=True):""" 正向传播,使用矩阵的方法进行"""if not self.is_initialized:self.in_ch = X.shape[3] # x shape : nsamp, w, h , inch .self._init_params()W = self.params["W"]b = self.params["b"]n_samp, in_rows, in_cols, in_ch = X.shapes, p, d = self.stride, self.pad, self.dilationY = conv2D_gemm(X, W, stride=s, pad=p, dilation=d) + b # Y = X * Wa = self.acti_fn(Y)if retain_derived :self.X.append(X)self.derived_variables["Y"].append(Y)return adef backward(self, dLda, retain_grads=True):"""反向传播的定义:param dLda: shape : nsamp, outrows, outcols, outch. # 形状与a, Y是一样的。:param retain_gradient: 保存参数的梯度。:return: 返回的是输入X的梯度。"""if not isinstance(dLda, list):dLda = [dLda]X = self.XdX = []Y = self.derived_variables["Y"]for da, x, y in zip(dLda, X, Y):dx, dw, db = self._bwd(da,x,y)dX.append(dx)if retain_grads:self.gradients["W"] += dwself.gradients["b"] += dbreturn dX[0] if len(dX)==1 else dXdef _bwd(self, dLda, X, Y):""" 反向传播的计算细节"""W = self.params["W"]d = self.dilationfr,fc, in_ch, out_ch = W.shapen_samp, out_rows, out_cols, out_ch = dLda.shape# 这里先将X转化成条状形式的,因为正向传播就是这样计算的,然后应用这个条状形式的X进行梯度计算,# 此时得到的梯度形状当然也会是条状形式的,但是我们可以应用索引的 运算反向映射会相应的4D形式。(fr,fc), s, p = self.kernel_shape, self.stride, self.paddLdy = dLda * self.acti_fn.grad(Y) # shape : nsamp, outrows, outcols, outch. # 形状与a, Y是一样的。dLdy_col = dLdy.transpose(3,1,2,0).reshape(out_ch, -1) # # Y = W * X# outch, outrows, outcols, nsamp. --> outch, outrows*outcols*nsampX_col, p = im2col(X, W.shape, p, s, d) # X_col shape : nin*fr*fc , noutrows*outcols*nsampW_col = W.transpose(3,2,0,1).reshape(out_ch, -1).T # fr,fc, nin,nout. ---> nout,nin,fr,fc ---> nout, nin*fr*fc# dW = DY*X.T# dx = W.t * dy# db = dy.sum(axis=1).reshape(1,1,1,-1)dW = (dLdy_col @ X_col.T).reshape(out_ch, in_ch, fr,fc).transpose(2,3,1,0)db = dLdy_col.sum(axis=1).reshape(1,1,1,-1)dX_col = W_col @ dLdy_col # col 形状的。dX = col2im(dX_col, X.shape, W.shape, p, s, d).transpose(0,2,3,1)return dX, dW, db@propertydef hyperparams(self):return {"layer": "Conv2D","pad": self.pad,"init_w": self.init_w,"in_ch": self.in_ch,"out_ch": self.out_ch,"stride": self.stride,"dilation": self.dilation,"acti_fn": str(self.acti_fn),"kernel_shape": self.kernel_shape,"optimizer": {"cache": self.optimizer.cache,"hyperparams": self.optimizer.hyperparams,},}本文链接:https://my.lmcjl.com/post/1981.html
展开阅读全文

4 评论